Space Marine from THQ is almost here! See the countdown clock here: http://www.spacemarine.com/home
Also floating around the internet is news that he demo for the game will be released August 23. The PC version, downloadable on Steam, will be available August 18. From everything I've heard, this game is completely living up to the hype and the THQ experience of the license.
Way to go THQ! Now... let's go smash some ork faces!
Showing posts with label Space Marine. Show all posts
Showing posts with label Space Marine. Show all posts
Wednesday, August 17, 2011
Wednesday, August 03, 2011
Wednesday, July 06, 2011
THQ Still Loves GW
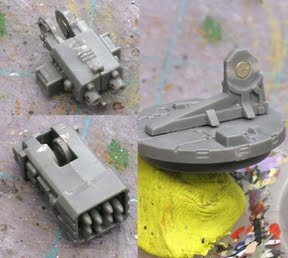
With the upcoming release of THQ's Space Marine, there is a bit of chatter as to whether or not Space Marine is just another Gears of War clone. As THIS REVIEW will tell you, that claim is utter nonsense! Below are a couple of screen shots that accompany the review:


Ok, so this wasn't much of a post, but I'm getting jazzed for the release of this game! September just can't come soon enough...
Ok, so this wasn't much of a post, but I'm getting jazzed for the release of this game! September just can't come soon enough...
Friday, July 01, 2011
DIY: 40k Conversions - Conversion Beamer
One really cool option that is seldom played on the 40k table by vanilla marine armies is the Master of the Forge. Most people don't like him because: (a) he doesn't have an invulnerable save, and (b) he is essentially a two-wound version of the techmarine, which can be purchased for much less, and without taking up an HQ slot. But there is one really awesome piece of equipment that is available to the Master that can not be purchased anywhere else... in the entire game: the conversion beamer. A conversion beamer is an odd little device that has a variable strength and ap value based upon the distance to your target... but the further away from your target you get, the better it works. And at a 72" max range, you're most effective when almost nothing else in the game can touch you. The odd thing about this little device? Nobody knows what it looks like! No model has been made for it since at least the Rogue Trader days, and that's the last time a picture was produced too. While this may cause some people frustration, I think it's a great opportunity for some conversion work.

(The RT conversion beamer in all its black and white glory.)


Interestingly, most likely because most current 40k players either didn't play the game back in RT, or much more disturbingly, simply weren't alive yet, there have been many attempts at capturing what the conversion beamer should look like:
From Stillfrosty at LINK:
Note in this version the conversion beamer uses a 'dish' to beam the deadly signal, but is essentially the size of a bolter.
From Digitaldaggers on the Bolter and Chainsword forums LINK:
This thing looks like it's mostly centered around a plasma cannon, but that thing is massive! Talk about the extreme opposite from the bolter version.
From Gurth on the Botler and Chainsword forums LINK:
 Take a good look at the guy in the middle. This is an amazing scratch version of the conversion beamer that has been given to some rogue trader era space marines... back when even a humble foot soldier could carry them into battle. I don't know if Gurth actually made this model or if he just found it on the web somewhere, but I do seem to recall that someone, somewhere, scratch built and then cast that thing for his own personal use...
From WeeMan LINK:
 This one is also based on some RT era parts, but relies on the old plasma cannon for its design. Note that in this model you will see a fairly popular trend to put the master on a bike. It makes sense that if you're going to want to fire that weapon at maximum range, then you need to be able to move fast enough to fire it that way! By putting him on a bike you don't have to tie up a transport, and that extra toughness boost doesn't hurt either... even though S8 weapons will still make him go splat.
From Stillfrosty LINK:
 I think this is a model that Stillfrosty found on the web when trying to figure out how he was going to do his own version, but I could be mistaken. Either way, note that this is another massive version of the beamer, and has even been loaded onto a sidecar like WeeMen's version. It's interesting to see that some people have decided a man portable relic should have the profile of a small tank...
From Turbo_MMX on the dakkadakka forums LINK:
 This is, by far, my favorite version of the beamer, and I used it as the basis for my own conversion. Note that as a plasma gun, it's still about the size of a bolter, but with the addition of the dish on front and the clever targeting module from the Ravenwing sprue, this thing becomes something just a little beefier than your typical hand weapon. Also like Turbo_MMX, I decided to put mine on a bike as well, to take full advantage of the need for mobility and the toughness boost, without having to use the larger sidecar footprint.
This conversion is deceptively simple, and you can pull it off without any step-by-step instructions, although there should be some within that dakka page I've cited above.
Although I do not have a picture of mine up here yet, I'll do so once I've thrown some paint on it. I prefer not to show my models in their ugly naked stages, but I think you'll find some fairly common similarities between my model and the one above. When I get around to painting my own Master of the Forge, I'll be sure to post him up here as an update... or as a page by himself with a link back to this page.
But what should we learn from all of these pictures? Sometimes not having everything spelled out by GW creates great opportunities for real creativity to flow in the creation of your conversions. At least, that's my take on it...
From Gurth on the Botler and Chainsword forums LINK:
From WeeMan LINK:
From Stillfrosty LINK:
From Turbo_MMX on the dakkadakka forums LINK:
This conversion is deceptively simple, and you can pull it off without any step-by-step instructions, although there should be some within that dakka page I've cited above.
Although I do not have a picture of mine up here yet, I'll do so once I've thrown some paint on it. I prefer not to show my models in their ugly naked stages, but I think you'll find some fairly common similarities between my model and the one above. When I get around to painting my own Master of the Forge, I'll be sure to post him up here as an update... or as a page by himself with a link back to this page.
But what should we learn from all of these pictures? Sometimes not having everything spelled out by GW creates great opportunities for real creativity to flow in the creation of your conversions. At least, that's my take on it...
Friday, June 03, 2011
Borrowed Hobby Tips: Assembling a Drop Pod
Below is a fantastic article put together by Ron at his awesome From the Warp blog that I'm posting here in case you missed it at its original location. As usual, I am re-posting his work, without permission, but I strongly suggest that you visit his site for some other great articles; his stuff is consistently top-notch. I have added some of my own comments at the bottom with regard to my own approach. I just wish he'd put this up before I magnetized a couple of pods on my own...
 If you've never built one of these before, you owe to yourself to do some research before you get underway.
There are a few things you need to know before you put glue to plastic.
Magnetizing is an added benefit, not necessary, but definitely nice to do.
This tutorial covers the basic construction and magnetizing of the doors and both weapons for the drop pod. You can skip the magnetizing parts and still use all the info here to build your pod.
Believe me, reading this before you attempt to build your own will help you out tremendously. I wish I had it before I started mine. Make sure to read through the whole thing before attempting it though. While it's presented in the order you should do things, there is some room to move things around and depending on what tools you have available, you may need to do just that.
The follow up to this post will be the painting of the same pod. The construction of this is designed to allow easy painting of the final three sub-assemblies so that you can get into all the tight spaces fairly quickly and easily with the last step being to glue the three components together.
Start by cutting and cleaning everything
Start out by making sure you have all your pieces and your tools. If you're magnetizing this, you'll need a few more things in addition to your clippers, files and glue. I use 1/8 inch rare earth magnets for my work. I've got a 1/8 drill bit that I use to create the perfect size hole for the magnets to rest comfortably in. This project requires 13 magnets when all said and done.
I've found it easiest to clip everything from the sprue and take care of all my mold lines. Once I have everything ready, then I start building.
We're going to build three sub-assemblies. The inner harness assembly, the floor and doors and the engine/fin assembly.
The inner harness assembly
This is perhaps the most important thing of the whole project. Understanding this little tidbit matters. Unfortunately, GW is not that clear in their directions and most of us have figured this out by trial and error.
 The
center console itself can sit on the floor base facing any direction.
The key is getting the components of the Sergent's individual harness
correct.
The
center console itself can sit on the floor base facing any direction.
The key is getting the components of the Sergent's individual harness
correct.
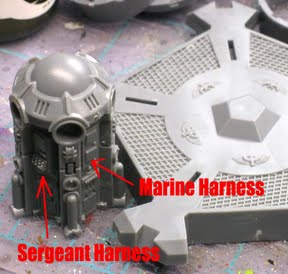
To do that, we need to know what components make up the Sergeant harness.
On the center console itself, it will be the one panel that has the keypad and readout screen and not just two blank spots. The blanks spots are all the Marine harness points.
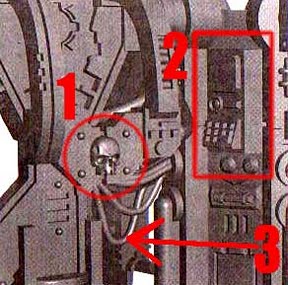 GW provides this tiny picture in the instructions but no real explanation as to why it's there.
There are three things you need to note about the drawing.
1. The Sergeant shoulder harness is the one with the skull. The rest have round blanks in the same position.
2. That particular harness/upright assembly needs to plug into that particular panel on the center console.
3. The Sergeant also has a specific upright piece as well and it can be determined by the low hanging cable that none of the other uprights have.
If you try and fit any other harness into the Sergeant upright, you'll notice that you'll have considerable trouble. This is because the pegs for his particular shoulder harness are made to fit into his particular upright piece. Get this correct and the rest is a piece of cake.
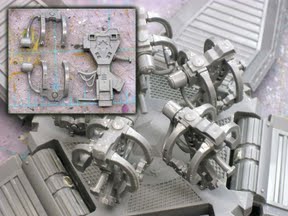 You can see each "harness" is actually two (one on each side) and an upright in the middle.
I built all of my harnesses and then attached them to the console making sure to put the Sergeant harness next to the correct panel on the console.
In the picture there, I have them resting on the floor piece, but they are NOT glued in place yet to the floor.
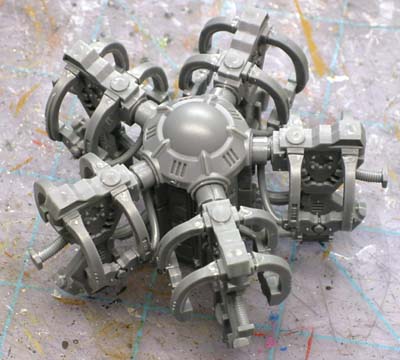
And the completed inner harness assembly. Each harness has been glued into the console. This part is done now. We can set it aside for later on.
The floor and doors
The majority of the work here is due to the fact that I magnetized the doors. Drop that option and you should be able to cruise through this portion with ease. The first thing is to build each door by gluing the halves together.
 I elected to magnetize the doors in such a way that the magnet is not obvious and positioned at the tip of the door when opened.
I wanted to keep the doors upright, but did not want them to close so tightly that it would be difficult to get the open either.
The drawback to this method is that the magnets are positioned in such a way that if they do break, it will be almost impossible to repair.
They should not need to be repaired I believe with normal use, but it's worth noting and being aware of it if that is a big concern when building your own pod.
We start by gluing a small piece of sprue (narrow end upright) just a millimeter or two from the edge of each door opening. Mark the middle of it along with the middle of your door. It's best to place the door in the frame to see how it all lines up.
The magnet will go in the door itself just above the seam between the two halves as seen in the picture. The line up between both magnets does not need to be perfect, but you want to get it as close as possible.
Also make sure that your magnets are flush with the surface they are embedded in. There is not a lot of wiggle room here and it pays to get as close as possible.
 Drill your hole in each piece and secure your magnet to each half.
I don't think I need to remind everyone about magnet polarity. If you get it wrong, you'll need some creative cutting to extract the snugly glued in place magnet.
Once you have all the doors done this way, you can test them out to see how they work.
There should be just enough draw between the magnets that the door will "pop" into the upright position when it gets close, but not so much that it can't easily be pulled away.
 Here you can see how the finished door will look. The magnet is barely visible in the open position.
When closed, you can see how the two magnets line up (this is prior to the floor being glued in place).
You'll want to make sure all of your doors are functioning correctly prior to gluing the floor decking in place. Once it's down, you can't make any more adjustments.
Inevitably, one door will not operate as smooth as the other four.
You'll need to do some cleaning up of the joints in order to make sure everything works as it should.
 Using this picture as a guide, we're going to clean up a few connections to make sure everything operates without trouble.
All we're trying to do here is take the tip of our X-Acto blade or file and clean away a bit of the surface area to increase the tolerances.
If you're using a file, you may need to back up and do this before gluing everything in place as you won't be able to get in there once it is glued.
1. This is actually for the fins to connect to in the next part. We just want to make sure they can be slotted in here without having to squeeze them in place.
2. The bottom of the door and the top of the floor deck. If this area is snug, you won't be able to get your door closed all the way without having to force it into position and we don't want to have to do that.
3. Make sure the sides of your doors are kept clean and free of glue and debris. Any junk in here will also make moving the door troublesome.

In the end, we want our doors to all close up to this position. There shouldn't be much of a gap between them when closed. Not much more than the thickness of the stabilizing fin that goes between them.
Will you get them 100 percent perfect? No.
You shouldn't kill yourself trying to do it either. With a little work, you should be able to get real close. You just have to keep in mind that this is plastic we're working with and these things are not as perfect as we'd like them to be sometimes. Just look at the old Land Speeders.
Once you are comfortable with how all your doors are operating, glue the top portion of the floor deck to the base. This part is done. You can also glue the engine vents to the underside at this time.
The engine and fin assembly
 We
start with building the upper engine assembly. The stabilizing fin you
see in the picture is for reference only. It is not glued in place at
this point.
We
start with building the upper engine assembly. The stabilizing fin you
see in the picture is for reference only. It is not glued in place at
this point.
The red pieces are glued together and the blue pieces are glued together. This will allow you to actually rotate the weapon mount when done if you are careful in how much glue you use later on.
You can see the magnet in the middle of the weapon mount. I cut away the stud, drilled out the hole and inserted a magnet into the opening.
Whatever magnet you use, make sure it is not any thicker than the width of the plastic for the mount.
 If you look closely, you can see that each weapon has a magnet inside it too.
Where it would connect to the mount by way of the pin, I have glued a magnet in place there.
Again, make sure you check your polarity. Once you glue the weapon halves together, it may real tough to get them apart to fix it.
Doing it like this will allow you to use the parts that come with the pod and still make the weapons interchangeable. It's just a matter of sliding one off and sliding the new one in place.
Next we glue on the five engine housing pieces to the upper engine. This will allow us to position our fins on the engine correctly in the following step.
This last part can be a bit tricky, but once you get two fins in place, the rest will be easy.

The first thing you do is set you inner harness assembly down on the floor deck. It should sit in place without any trouble. DO NOT glue it in place yet.
With the harness in place, take your upper engine assembly and add a drop or two of glue in the slot created by two of the engine blocks you just added to it.
With your upper engine assembly in one hand and a fin in the other, you want to position the fin correctly on the floor deck (make sure it's connected to the harness correctly too) and then glue it to the upper engine housing.
Things should fit together snug enough that they will hold while the glue dries. What we are trying to do is simply glue the fins to the upper engine housing without gluing it to anything else just yet. This allows us to lift the engine/fin assembly straight up when dry and remove the harnesses as well.
Before you take all the assemblies apart, make sure to place a dot on the underside of each one so that you can line everything back up together once you have it painted. In a perfect world, all of them would be the same and you wouldn't have to worry, but we don't have that luxury here.
We should have three distinct sub assemblies now that we can paint and then reassemble afterwards. If this seems like a lot of work, it is. But... I have three pieces now that I can paint up fairly quickly and reassemble without any trouble creating a complete drop pod.

The definitive guide to building and magnetizing a Space Marine Drop pod
If you've never built one of these before, you owe to yourself to do some research before you get underway.There are a few things you need to know before you put glue to plastic.
Magnetizing is an added benefit, not necessary, but definitely nice to do.
This tutorial covers the basic construction and magnetizing of the doors and both weapons for the drop pod. You can skip the magnetizing parts and still use all the info here to build your pod.
Believe me, reading this before you attempt to build your own will help you out tremendously. I wish I had it before I started mine. Make sure to read through the whole thing before attempting it though. While it's presented in the order you should do things, there is some room to move things around and depending on what tools you have available, you may need to do just that.
The follow up to this post will be the painting of the same pod. The construction of this is designed to allow easy painting of the final three sub-assemblies so that you can get into all the tight spaces fairly quickly and easily with the last step being to glue the three components together.
Start by cutting and cleaning everything
Start out by making sure you have all your pieces and your tools. If you're magnetizing this, you'll need a few more things in addition to your clippers, files and glue. I use 1/8 inch rare earth magnets for my work. I've got a 1/8 drill bit that I use to create the perfect size hole for the magnets to rest comfortably in. This project requires 13 magnets when all said and done.
I've found it easiest to clip everything from the sprue and take care of all my mold lines. Once I have everything ready, then I start building.
We're going to build three sub-assemblies. The inner harness assembly, the floor and doors and the engine/fin assembly.
The inner harness assembly
This is perhaps the most important thing of the whole project. Understanding this little tidbit matters. Unfortunately, GW is not that clear in their directions and most of us have figured this out by trial and error.
The
center console itself can sit on the floor base facing any direction.
The key is getting the components of the Sergent's individual harness
correct. To do that, we need to know what components make up the Sergeant harness.
On the center console itself, it will be the one panel that has the keypad and readout screen and not just two blank spots. The blanks spots are all the Marine harness points.
GW provides this tiny picture in the instructions but no real explanation as to why it's there.There are three things you need to note about the drawing.
1. The Sergeant shoulder harness is the one with the skull. The rest have round blanks in the same position.
2. That particular harness/upright assembly needs to plug into that particular panel on the center console.
3. The Sergeant also has a specific upright piece as well and it can be determined by the low hanging cable that none of the other uprights have.
If you try and fit any other harness into the Sergeant upright, you'll notice that you'll have considerable trouble. This is because the pegs for his particular shoulder harness are made to fit into his particular upright piece. Get this correct and the rest is a piece of cake.
You can see each "harness" is actually two (one on each side) and an upright in the middle.I built all of my harnesses and then attached them to the console making sure to put the Sergeant harness next to the correct panel on the console.
In the picture there, I have them resting on the floor piece, but they are NOT glued in place yet to the floor.
And the completed inner harness assembly. Each harness has been glued into the console. This part is done now. We can set it aside for later on.
The floor and doors
The majority of the work here is due to the fact that I magnetized the doors. Drop that option and you should be able to cruise through this portion with ease. The first thing is to build each door by gluing the halves together.
I elected to magnetize the doors in such a way that the magnet is not obvious and positioned at the tip of the door when opened.I wanted to keep the doors upright, but did not want them to close so tightly that it would be difficult to get the open either.
The drawback to this method is that the magnets are positioned in such a way that if they do break, it will be almost impossible to repair.
They should not need to be repaired I believe with normal use, but it's worth noting and being aware of it if that is a big concern when building your own pod.
We start by gluing a small piece of sprue (narrow end upright) just a millimeter or two from the edge of each door opening. Mark the middle of it along with the middle of your door. It's best to place the door in the frame to see how it all lines up.
The magnet will go in the door itself just above the seam between the two halves as seen in the picture. The line up between both magnets does not need to be perfect, but you want to get it as close as possible.
Also make sure that your magnets are flush with the surface they are embedded in. There is not a lot of wiggle room here and it pays to get as close as possible.
Drill your hole in each piece and secure your magnet to each half.I don't think I need to remind everyone about magnet polarity. If you get it wrong, you'll need some creative cutting to extract the snugly glued in place magnet.
Once you have all the doors done this way, you can test them out to see how they work.
There should be just enough draw between the magnets that the door will "pop" into the upright position when it gets close, but not so much that it can't easily be pulled away.
Here you can see how the finished door will look. The magnet is barely visible in the open position.When closed, you can see how the two magnets line up (this is prior to the floor being glued in place).
You'll want to make sure all of your doors are functioning correctly prior to gluing the floor decking in place. Once it's down, you can't make any more adjustments.
Inevitably, one door will not operate as smooth as the other four.
You'll need to do some cleaning up of the joints in order to make sure everything works as it should.
Using this picture as a guide, we're going to clean up a few connections to make sure everything operates without trouble.All we're trying to do here is take the tip of our X-Acto blade or file and clean away a bit of the surface area to increase the tolerances.
If you're using a file, you may need to back up and do this before gluing everything in place as you won't be able to get in there once it is glued.
1. This is actually for the fins to connect to in the next part. We just want to make sure they can be slotted in here without having to squeeze them in place.
2. The bottom of the door and the top of the floor deck. If this area is snug, you won't be able to get your door closed all the way without having to force it into position and we don't want to have to do that.
3. Make sure the sides of your doors are kept clean and free of glue and debris. Any junk in here will also make moving the door troublesome.
In the end, we want our doors to all close up to this position. There shouldn't be much of a gap between them when closed. Not much more than the thickness of the stabilizing fin that goes between them.
Will you get them 100 percent perfect? No.
You shouldn't kill yourself trying to do it either. With a little work, you should be able to get real close. You just have to keep in mind that this is plastic we're working with and these things are not as perfect as we'd like them to be sometimes. Just look at the old Land Speeders.
Once you are comfortable with how all your doors are operating, glue the top portion of the floor deck to the base. This part is done. You can also glue the engine vents to the underside at this time.
The engine and fin assembly
We
start with building the upper engine assembly. The stabilizing fin you
see in the picture is for reference only. It is not glued in place at
this point.The red pieces are glued together and the blue pieces are glued together. This will allow you to actually rotate the weapon mount when done if you are careful in how much glue you use later on.
You can see the magnet in the middle of the weapon mount. I cut away the stud, drilled out the hole and inserted a magnet into the opening.
Whatever magnet you use, make sure it is not any thicker than the width of the plastic for the mount.
If you look closely, you can see that each weapon has a magnet inside it too.Where it would connect to the mount by way of the pin, I have glued a magnet in place there.
Again, make sure you check your polarity. Once you glue the weapon halves together, it may real tough to get them apart to fix it.
Doing it like this will allow you to use the parts that come with the pod and still make the weapons interchangeable. It's just a matter of sliding one off and sliding the new one in place.
Next we glue on the five engine housing pieces to the upper engine. This will allow us to position our fins on the engine correctly in the following step.
This last part can be a bit tricky, but once you get two fins in place, the rest will be easy.
The first thing you do is set you inner harness assembly down on the floor deck. It should sit in place without any trouble. DO NOT glue it in place yet.
With the harness in place, take your upper engine assembly and add a drop or two of glue in the slot created by two of the engine blocks you just added to it.
With your upper engine assembly in one hand and a fin in the other, you want to position the fin correctly on the floor deck (make sure it's connected to the harness correctly too) and then glue it to the upper engine housing.
Things should fit together snug enough that they will hold while the glue dries. What we are trying to do is simply glue the fins to the upper engine housing without gluing it to anything else just yet. This allows us to lift the engine/fin assembly straight up when dry and remove the harnesses as well.
Before you take all the assemblies apart, make sure to place a dot on the underside of each one so that you can line everything back up together once you have it painted. In a perfect world, all of them would be the same and you wouldn't have to worry, but we don't have that luxury here.
We should have three distinct sub assemblies now that we can paint and then reassemble afterwards. If this seems like a lot of work, it is. But... I have three pieces now that I can paint up fairly quickly and reassemble without any trouble creating a complete drop pod.
Follow-up Thoughts
And that ends Ron's post. As you'll see in the pictures below, I chose to put magnets on the other end of the pod doors when I put pods together. My thought was that you'd not only be able to keep the doors closed (which you can), but it would also allow you to stick things on the outside of the pod... such as tentacles, an exoskeleton, or whatever... in order to make them "infested" pods for use in a tyranid army. Given the trouble I had with opposing polarities on my version, however, I like Ron's solution a LOT better than my own. I MUST try this out the next time I set about putting pods together... Ron has come up with an elegant solution to a great looking model (that can be a challenge to put together well).Saturday, January 29, 2011
DIY: 40k Conversions - Rifleman Dreadnought
The rifleman dreads (2x TL autocannons) are one of the simplest, and most point efficient, ways to bring long range supression and anti-transport fire to the tabletop. The lascannon/missile launcher variety is certainly better for cracking tough armor, but it is more expensive and puts out far less shots.
The following is an extremely cost effective solution to bringing riflemen to the table. You can often find packs of three autcannons from $3-$7 if you shop around. So for 3 dreads (think 12 twin-linked S7 AP4 shots per round), $20-$25 + shipping is all it's probably going to cost you. Not bad considering the Forgeworld autocannon arms cost around $11 each.
Per dreadnought you will need:
- 4 IG autocannons with ammo canisters (the ones that are hollow on the inside)
- a hobby knife
- a file
- super glue
- plastic snips
- plasticard
- greenstuff

Step One
The first step is to make some inital cuts. Using a hobby knife or snips, cut at the red lines indicated below.

Step Two
One you have cut, use the file to flatten out the trimmed area. The mounting is not flat, so it will take a little care to make it square.
Step Three
Once both gun mounts are flat, glue them together. Then glue one ammo cannister to one of the autocannons - the one you want on the outside of the dreadnought. Remember that for each set of arms, you will want canisters mounted on opposite sides. This will probably not make a difference given how they are constructed, but you might want to take care to leave the best side on the outside. At this point your guns should look like this.

Step Four
Here is the tricky part. As you can see, because of the way we glued the guns, you have one ammo feed on the outside and one on the inside of the arm. What you need to do now is carefully use your hobby knife to cut the inside aiming ammo feed off. It should be the one you haven't glued a canister to yet. Also cut off the handle to the crank on the gun. Then turn around the ammo feed bit you cut off and attach cannister to it. Now your arms should have the ammo cannisters both on the same side and look like this:

Now, you have some decisions to make. The arms won't fit exactly as they are, so you have options.
A) You can add magnets to the inside so that the arms are easily switchable.
B) You can use plasticard to cut out a circle to fit the posts on the body. This is a bit more laborious and requires taking off a little at a time to ensure a good fit. If not fit correctly, they'll sag noticeably.
Finally, I don't like exposing the space that the backs of the guns show, so I used plasticard and greenstuff to fill in the gaps and cover it up yielding a final-ish product that looks like this:

With a little care and a trip to your bitz box, you may be able to find something to make the outside of the weapon look suitably menacing. Either way, once you're done, you can file down the greenstuff to make a nice eaven covering and voila! You have TL autocannon arms. The approximate time required to make each set of arms is 30 minutes, give or take.
In the end, you will have a guy that looks something similar to this:

If you enjoyed this, don't leave a comment here. Go over to Dave's post and leave comments there. He deserves the accolades for his ingenuity.
Tuesday, January 25, 2011
Movie Marines in 5th Edition
(Adapted and reformatted, without permission, from Mkerr's original 2009 article at the Bell of Lost Souls. The substance of the article remains as only terminology and cosmetic changes have been made. I have also 'snipped' some unnecessary language.)
In January of 2005, White Dwarf published a spectacular 300th issue that included an over-the-top army list called "Space Marines in the Movies". These unofficial rules were designed to represent our favorite Space Marines as action movie heroes. It was a tongue-in-cheek article, but I don't think it would take a lot of work to make this a playable army list (Note: I'm revising my "not a lot of work" comment, lol -- Mkerr from 24 hours in the future).
The army list represents a single Tactical Marine squad fighting off a much larger foe. The army list is designed for 1,500 point games, but you can build armies up to around 1,900 points. If you try the army list at fewer or more than 1,500 points, let me know how it worked.
**HQ**
1 SPACE MARINE SERGEANT..........................................200 Points
"The movie army is led by a tough, grizzled Veteran Sergeant, leading in a resolute and uncompromising fashion. He is also a lethal man in a fight and more than eager to give Johnny Xenos a sound thrashing."
| WS | BS | S | T | W | I | A | Ld | Sv | |
|---|---|---|---|---|---|---|---|---|---|
| Sergeant | 8 | 7 | 6 | 6 | 3 | 6 | 4 | 10 | 3+ |
| Composition: | Wargear: | Special Rules: |
| * 1 Unique | * Bolt pistol | * Force of One |
| * Chainsword | * Listen Up, Maggots | |
| Unit Type: | * Bolter | * Fleet |
| * Infantry | * Frag and krak grenades | * Move Through Cover |
| * Auto-senses | * Combat Tactics | |
| * Power armor | * Stubborn |
Options:
The Sergeant may replace chainsword with a power fist for +50 points.
The Sergeant may replace bolt pistol with a plasma pistol for +50 points.
SPECIAL RULES
Listen Up, Maggots: The Sergeant often finds himself as the last surviving leader in the chain of command. He maintains discipline with constant vigilance and a sharp tongue. All Space Marines with line of sight to the Sergeant may re-roll failed Morale check and Pinning tests.
Note: All Movie Marine armies are led by a single Sergeant. That's what the "1" in the "1 Space Marine Sergeant" means.
**ELITE**
0-1 SPACE MARINE VETERAN ........................................150 Points
"The Veteran is the Sergeant's right hand man. As the most experienced member of the unit after the Sergeant, the Veteran is the de facto Squad Leader of the second element when the unit breaks into Combat Squads."
| WS | BS | S | T | W | I | A | Ld | Sv | |
|---|---|---|---|---|---|---|---|---|---|
| Veteran | 7 | 6 | 6 | 6 | 2 | 6 | 4 | 9 | 3+ |
| Composition: | Wargear: | Special Rules: |
| * 1 Unique | * Bolter | * Force of One |
| * Frag and krak grenades | * Second in Command | |
| Unit Type: | * Auto-senses | * Fleet |
| * Infantry | * Power armor | * Move Through Cover |
| * Combat Tactics | ||
| * Stubborn |
Options:
The Veteran may be equipped with Special Issue Ammunition for +50 points.
SPECIAL RULES
Second in Command: The Veteran is the nominal leader of "Element 2" but will lead the entire unit if the Sergeant falls in battle. If the Sergeant has been removed as a casualty, all Space Marines within 12" of the Veteran may re-roll failed Morale check and Pinning tests.
Special Issue Ammunition: If equipped with Special Issue Ammunition, any wounds caused by the Veteran's bolter ignore both cover and Invulnerable saves.
**TROOPS**
Note: Instead of 0-6 Space Marines, from the original article, the Troops section has been divided into two "Elements", which better fits the background of Space Marines and their Combat Squad rules. A Movie Marine army list must include one of each of the below Elements.
1 SPACE MARINE COMBAT SQUAD: Element 1...................100 Points per Space Marine
"This listing represents typical Space Marines -- if you call 7' tall, genetically engineered, psychologically conditioned killing machines that digest poison, spit acid, and can survive in a vacuum 'typical.' Would you want to tangle with them?"
| WS | BS | S | T | W | I | A | Ld | Sv | |
|---|---|---|---|---|---|---|---|---|---|
| Space Marine | 5 | 5 | 6 | 6 | 2 | 5 | 3 | 9 | 3+ |
| Composition: | Wargear: | Special Rules: |
| * 1-4 Marines | * Bolter | * Force of One |
| * Frag and krak grenades | * Do You Want Some of This? | |
| Unit Type: | * Auto-senses | * Fleet |
| * Infantry | * Power armor | * Move Through Cover |
| * Combat Tactics | ||
| * Stubborn |
Options:
One Space Marine (in Element 1) may replace his bolter with:
- a flamer for +70 points
- a meltagun for +80 points
- a plasma gun for +100 points
1 SPACE MARINE COMBAT SQUAD: Element 2.................100 Points per Space Marine
Element 2 is usually equipped with a heavy weapon and deals with hard targets, while Element 1 contains the command and assault elements of the unit.
| WS | BS | S | T | W | I | A | Ld | Sv | |
|---|---|---|---|---|---|---|---|---|---|
| Space Marine | 5 | 5 | 6 | 6 | 2 | 5 | 3 | 9 | 3+ |
| Composition: | Wargear: | Special Rules: |
| * 1-4 Marines | * Bolter | * Force of One |
| * Frag and krak grenades | * Do You Want Some of This? | |
| Unit Type: | * Auto-senses | * Fleet |
| * Infantry | * Power armor | * Move Through Cover |
| * Combat Tactics | ||
| * Stubborn |
Options:
One Space Marine (in Element 2) may replace his bolter with:
- a heavy bolter for +100 points
- a missile launcher for +120 points
- a lascannon for +150 points
** HEAVY SUPPORT**
Note: A Movie Marine army may only take a single heavy support choice.
0-1 RHINO..........................................130 Points
| FA | SA | RA | BS | ||||||
|---|---|---|---|---|---|---|---|---|---|
| Rhino | 13 | 12 | 11 | 5 |
| Composition: | Wargear: | Special Rules: |
| * 1 Rhino | * Storm bolter | * Repair |
| * Smoke launchers | ||
| Unit Type: | * Searchlight | Transport Capacity: |
| * Vehicle (Tank) | * Assault vehicle | Ten Models |
Options:
A Space Marine Rhino may purchase extra armor for +50 points.
Special Rules:
Repair: Instead of shooting its storm bolter, a Rhino may automatically repair an Immobilized result.
0-1 RAZORBACK..........................................200 Points
| FA | SA | RA | BS | ||||||
|---|---|---|---|---|---|---|---|---|---|
| Rhino | 13 | 12 | 11 | 5 |
| Composition: | Wargear: | |
| * 1 Rhino | * Twin linked heavy bolters | |
| * Smoke launchers | ||
| Unit Type: | * Searchlight | Transport Capacity: |
| * Vehicle (Tank) | * Assault vehicle | Six Models |
Options:
A Space Marine Razorback may replace its twin-linked heavy bolter with a twin-linked lascannon for +100 points.
A Space Marine Razorback may purchase extra armor for + 50 points.
SPECIAL RULES
Force of One: Space Marines generally work in squads, but individual models may move out of unit coherency and may operate independently. The concept of unit is fluid to the battle-hardened Space Marine. As long as a Space Marine is within 4" of another Space Marine they are considered to be part of the same unit. Additionally, multiple Space Marine units can ride in the same transport, embarking and disembarking independently.
Note: Use the Force Organization chart to determine kill points for Annihilation missions. Each unit counts as two kill points and the entire unit must be removed to gain the points. For example, a Movie Marine army with a Sergeant, a Veteran, two Elements and a Rhino count as 10 kill points.
Do You Want Some of This?: If a Space Marine is removed because of the No Retreat rule, then he will go crazy ape bonkers as he gets dragged down. He can fire either a bolter or bolt pistol at his enemies (make the attacks normally) or pull the pin on a Frag grenade (center the blast over the model) in an effort to take his foes with him.
SPACE MARINE ARMORY
Auto-senses: Space Marines count as being equipped with an auspex and may re-roll the dice when determining sighting distance for Night Fight.
Power Armor: Models in power armor may re-roll unsuccessful armor saves. Additionally, models in power armor gain a 4+ Invulnerable save.
Chainsword: A Chainsword is a power weapon that allows the wielder to re-roll any failed roll to wound. Additionally, all close combat attacks gain the Rending quality.
Power Fist: A Power Fist is a Strength 10 two-handed power weapon that is difficult and cumbersome to use, so attacks with a Power Fist are always delivered at Initiative 4. Additionally, a Power Fist rolls +3D6 (rather than +D6) for armor penetration.
Frag Grenades: Models armed with Frag grenades count as being equipped with assault and defensive grenades. Frag grenades can be used as a ranged weapon with the below profile. When used as a ranged weapon, Frag grenades ignore cover saves.
Krak Grenades: In addition to being used against a vehicle as normal grenades, Krak grenades can be used as a ranged weapon with the below profile. Krak grenades roll +2D6 (rather than +D6) for armor penetration.
| Range | Strength | AP | Type | |
|---|---|---|---|---|
| Bolt Pistol | 24" | 6 | 4 | Assault 3, Rending |
| Bolter | 36" | 6 | 4 | Assault 4, Rending |
| Plasma Pistol | 24" | 9 | 2 | Assault 3, Gets Hot! |
| Frag Grenades | 6" | 5 | 4 | Assault 1, Large Blast |
| Krak Grenades | 6" | 8 | 3 | Assault 1, Blast |
| Flamer | 24" | X | 4 | Assault 1, Pinning |
| Meltagun | 24" | 10 | 1 | Assault 1, Melta |
| Plasma Gun | 36" | 9 | 2 | Assault 4,Gets Hot! |
| Heavy Bolter | 48" | 7 | 3 | Heavy 10, Rending |
| Missile Launcher | 60" | * | * | * |
| Lascannon | 60" | 10 | 1 | Heavy 1, Lance |
Flamer: Select a target. If the target is in range, then every model in the target unit is automatically hit by the flamer (i.e., do not roll to hit and do not use the flamer template). Roll a D6 for each model. The flamer wounds on a 4+. Multi-wound models wounded by the flamer are covered with flaming promethium and must immediately make another save. If this save is passed, then the model puts out the flames. If the save is failed, the model takes another wound and must immediately make another save. This continues until the multi-wound model passes a save or is removed as a casualty.
Meltagun: A Space Marine meltagun within 24" rolls +2D6 (rather than +D6) for armor penetration. A Space Marine meltagun at half range or less rolls +3D6 (rather than +2D6) for armor penetration.
Heavy Bolter: A Space Marine heavy bolter that rolls four or more 1s to hit jams. The shots are resolved normally but do not gain the benefit of the Rending special rule. The heavy bolter acts normally in the next shooting phase. Vehicle mounted heavy bolters never jam.
Missile Launcher: A Space Marine missile launcher may fire either Frag or Krak missiles using the below profile. The firer may use any combination of Frag and Krak missiles when the weapon is fired.
| Range | Strength | AP | Type | |
|---|---|---|---|---|
| Frag Missile | 60" | 5 | 4 | Heavy 3, 7" Blast |
| Krak Missile | 60" | 8 | 3 | Heavy 3, Large Blast, Barrage |
Lascannon: Draw a 60" line from the Lascannon. Line of sight is not required and terrain is ignored. Roll to hit the closest unit. If the shot misses, the beam goes wild and no more hits are generated. If it hits, then roll to wound normally and move to the next closest unit touched by the line and roll to hit. Continue along the line until the lascannon misses or all units have been hit. Wounds are allocated normally against the unit (i.e., you can't snipe models with a Lascannon shot).
SPACE MARINE VEHICLE UPGRADES
Smoke Launchers: Space Marine smoke launchers follow the normal Warhammer 40,000 rules but may be used in every Space Marine Movement phase.
Searchlight: A vehicle equipped with a Space Marine searchlight ignores Night Fight rules.
Assault Vehicle: Disembarking Space Marines may assault.
Extra Armor: A vehicle with Space Marine extra armor ignores Stunned and Shaken results.
Friday, December 10, 2010
40k: Know Your Space Marines (No. 5): Deathstar Units
Every army has at least one Deathstar unit. The humble Space Marines actually have a couple of options, albeit of very
similar makeup. "What is a Deathstar unit?" you ask. Quite simply, a Deathstar unit is a high points cost unit that can
deal out a tremendous amount of damage to the enemy, but ultimately will hurt your army very badly if destroyed.
Deathstar 1: Lysander & Crew
Darnath Lysander is a beast in combat. With Eternal
Warrior, you're going to have to hit him again and again
before you bring him down. When you throw him into a unit of
terminators with storm shields, then your enemy has to determine
just which part of that threat he wants to take out first: the four
wound model with S10 hits, or the four individual terminators...
while getting smacked around with S10 hits. As Lysander makes them
stubborn, they will not suffer negative modifiers to their
leadership rolls even if they lose the combat, which means they're going
to stick around for a very long time. The only problem
with this unit is that it is very, very slow. To fix that problem you
also need to throw in a librarian with a storm shield and
the Gate of Infinity psychic power. The added threat of a force weapon
going at initiative and the ability to deep strike all over
the board makes this a unit the enemy just can't avoid.
Deathstar 2: Marneus Calgar & Crew
Marneus Calgar is a beast, and he is incredibly
expensive to boot. As an Eternal Warrior, like Lysander, you once
again are going to have a guy in the mix that the enemy will have to
decide whether to go after individually, or else take out the
single terminator models around him. Calgar is only S8 (with his
fists), but he has more attacks and also has the option to use
a power weapon against a foe that is going to hurt your terminator
escorts. And once again, since this is a slow unit, throwing
in a librarian with GOI is a must if you want to get this unit around
the board quickly. Alternatively, you can also use Calgar
as a forward element and allow the terminators to jump in with him at a
later time with his teleport beacon. Either way, once
they get together, this is a unit that will not break -- unless you want
it to due to Calgar's special rule -- and has a LOT of
heavy S8 power to throw around.
Deathstar 3: Kantor & Vanguard
Vanguard squads are cool. You can equip them with all
kinds of nasty weapons, all of which can have a nasty
sting. You can give them storm shields and power weapons, or power
fists, or thunder hammers. Alternatively, you can give them
plasma pistols and let them keep their standard chainswords to make them
the ultimate counter-attack unit. With base 2 attacks,
before you give them any equipment, you can easily give a unit of 10 men
30 attacks standing still, or 40 on the charge. Want
to make it even more sick? When you throw in Pedro Kantor, they all get
an additional attack with his special rule,
allowing this squad an unholy 50 smacks on the charge. Regardless of
whether you give them power weapons, or just let them keep
their chainswords, that is going to hurt a LOT of enemy units. Throw in
Kantor's own invulnerable save and power fist attacks, and
even the chainsword crew can take out just about anything you face.
Like the squads above, this unit is even nastier if you
elect to throw a librarian into the mix. They can all fit into a
landraider, or you can drop a couple and put them in a rhino.
Or you can use GOI and the librarian to get them around. With a few
well placed teleport homers early on in the game (drop pods,
perhaps?), this unit can be exactly where you need it at a moment's
notice. While it's always nice to have a storm shield on
your librarian, you can opt for a cheaper version and Might of Ancients
to give this squad a little extra punch. The only real
downside to this unit is that without storm shields, they are incredibly
fragile. Further, they can also get extremely
expensive VERY quickly. Consider that a terminator with storm shield
and thunder hammer is 40 points - each with 2 attacks. That
same loadout, with a vanguard marine is 75 points! Now, he'll also have
a jump pack at that cost, but WOW is that expensive --
especially when you consider that he'll only ever get a 3++ save while
the terminator has a natural 2+ with his armor. That's a
bummer, but this really is an incredibly nasty unit nonetheless. As an
alternate to the librarian, you can maximize this unit's
initial 50 attacks with a humble chaplain. His ability to re-roll
misses on the charge is an awesome way to make every hit
count.
Deathstar 4: Kantor & Honor Guard
If Vanguard are nasty, then honor guard are just plain obscene. Every man in the unit can have a relic blade
and auxiliary grenade launcher, which means they can hit you hard (in
addition to their bolter and bolt pistol shots) all the
way to the point they start dishing out S6 power weapon hits. Every man
in the unit has a base 2 attack if you keep the relic
blade, or base three if you use the power weapons they are purchased
with. Like the vanguard, that's 50 power weapon hits on the
charge (or 40 S6 power weapon hits if you use relic blades). That's a
LOT of nasty smacking. Artificer armor means that they have
the same ability to shrug off hits as a terminator, but they do not have an invulnerable save, and they can't purchase
one either. That inability to have an invulnerable save means that they
will probably not last very long against the enemy death star,
even though they'll chew through basic units. They do have longer reach
than the vanguard with their launchers and bolters, but
area also slow since they can't take jump packs. They'll need a
transport, or yet another librarian in order to give them the ability
to move around the board.
Deathstar 5: Lysander & Command Squad
We know Lysander is nasty, but the command squad is
another nasty option to use with him. Like a vanguard squad,
every man in this unit can take a storm shield and any close combat
weapon except a relic blade... except the apothecary. But the
apothecary does give the unit Feel No Pain, which is nothing to
sneeze at. Further, you can also throw in just about any
comb-weapon or special weapon you want as well. In a way, this unit
really bridges the gap between Vanguard and Sternguard by
giving them the ability to tap into either squad... or both squads at
the same time. That is not the best way to maximize their
fighting or shooting ability, but the option is there, I guess. The
downside to this unit, besides an apothecary that can't seem
to field anything other than his basic equipment, is that they are both
expensive and you can only take five of them. The size of
this squad means that it will not last over the long haul. Like all the
other units, this squad can benefit from a librarian like
most of the others, although they do have a more mobile option that I'll
discuss below.
Deathstar 6: Kor'sarro Khan & Command Squad
As a captain, Khan can take a command squad. And
command squads can take bikes. That means you can have a
nasty six man unit running around the board, with storm shields, power
weapons, T4(5), Feel No Pain, and the ability to Hit & Run,
Turbo Boost, and hit with Furious Charge. This is an extremely fast
unit that has the ability to deal out some serious damage...
albeit with only five men. Although a little light as far as
Deathstar units go, the cost is still pretty high, and it
can be pretty scary to face. Although Khan's ability to deal out an
insta-kill hit with his power weapon is a little suspect, on
the charge (which Hit & Run allows him to do often) his S5 smacks should be able to harm non-monstrous creatures
fairly easily almost every time.
Conclusion
As a jack-of-all-trades army, the Space Marines can build some pretty effective Deathstar units in some fairly
creative ways. No Deathstar is foolproof, but any of these units can be fun to run every now and then. Some are definitely
more fragile than others, but all of them have fangs.
Wednesday, October 27, 2010
40k: Know Your Space Marines (No. 4): Chapter Master Pedro Kantor
Pedro Kantor is an interesting special character with some fairly well thought out fluff in Codex: Space Marines. But this isn't a fluff article...
Basic Equipment
Like most captains and masters, Kantor wears power armor and has the very important 4+ iron halo. He's also got frag and krak grenades, a power first and an interesting side arm - Dorn's Arrow. The power fist is an interesting choice. It's fluffy, because he is the master of the "Crimson Fists" chapter, but it's also very slow. With a character that has a native Initiative of 5, I'd personally have preferred a power or relic weapon in order to take advantage of his speed. Unfortunately, because he doesn't have any other real close combat option, the power first makes Kantor a bit of a crap shoot in hand-to-hand combat. Yeah, he's going to hit hard, but will he last in order to make that hit? Your best bet is to group him with other marines so that he doesn't assault alone - which is important for other reasons as well. On the positive side, he can literally challenge anything on the battlefield with that fist, although it does mean that the krak grenades are absolutely pointless. As a support character, Kantor is great for last minute smacks on structures and vehicles, but he's probably not the best choice for leading the charge.
The other important weapon in Kantor's personal arsenal is Dorn's Arrow... or 'the magic storm bolter of 4s', as I think of it. This is an Assault 4 S4 AP4 storm bolter with a 24" range. The good thing about this weapon, instead of a fancy pistol, is that it's got the ability to really reach out and touch someone. Further, as he also has a power fist, it doesn't matter that he left his pistol at home. He can fire this puppy off at short or long range, and then charge in... to wait for the faster enemy to slap him around a bit... and then hopefully hit someone with his fist. With four shots, Kantor has essentially got the firepower of a combat squad of marines that he can fire on the move, which is pretty handy. Add in his BS of 5, and he isn't going to miss that often (although I've done it!). At S4, this means you're going to challenge most standard troops units in the game; but at AP4, it isn't going to challenge the troops choices that the native S4 takes advantage of (marines and chaos marines). Personally, I think that this little gem was meant for killing beefy ork nobs and tyrannid warriors, which he can do handily at range. Overall, not a bad weapon. Not a game winner, but still a little better than a standard bolter (or four!).
As a chapter master, Kantor also has access to a very nasty orbital bombardment. While a high strength pie plate should be a boon, it's actually kind of a 'meh'. In an odd twist, you can call in a bombardment and can then turn around and assault in the same turn, but you can't move the turn you use it. That seems a bit backwards. First, the last thing you want to do when you're actually in assault range is to drop a pie plate on the table that you can't reduce with your ballistic skill. The odds of that thing scattering back on you or your unit are just too high. And since you have to assault the thing you shot at, you're very rarely going to actually drop the plate and then assault the same target... unless you're really desperate. On the other hand, this would be the perfect weapon for softening up a target when you drop pod onto the field, or as you swoop across the field in your transport. But you can't do that. So, if you want to use the bombardment, you have to stand still and essentially do nothing for an entire turn. This is an odd choice, and kind of wasted on an assault and movement oriented character like Kantor. Unless you're in a scenario where you can waste a turn sitting on your hands, you might as well forget you have it. Oh well.
Also as a chapter master Kantor permits the use of honor guard units. Unfortunately, while honor guard units are very nasty, all running around with artificer armor, bolters, bolt pistols and power weapons, they are really pricey. Each one costs as much as a terminator, but they have no invulnerable save. At 115 points for just the first three men, this seems a bit excessive and the points would be much better spent on other units that are geared for the same battlefield role. Unless you enjoy hamstringing yourself for fun, there is really no point in throwing these guys onto the field.
Kantor comes into his own because of his special abilities. First up is "Chapter Tactics" which gives your entire army the Stubborn USR. There are lots of people that feel Stubborn is wasted on marines because they're actually better off falling out of combat and shooting rather than sticking in a fight. I disagree. The most effective way for dealing with assaulting armies, in my opinion, is to tie up the other guy's nasty assault units all game long with small units of marines that just won't die or fall back. The rest of your army can then pick off the enemy's support units and bigger slower monsters trolling the battlefield. But if you're going to do that, you have to stay in the fight! Stubborn will keep you there... provided you can make a few armor saves every turn.
The next special ability is "Hold the Line". This allows all Sternguard units in the army to count as scoring. What this means is you can increase the number of scoring units in your army considerably when a lot of objectives pop up on the field of play. Given the Sternguard's reported ability to hold onto objectives with the support of their special ammo, this is supposed to be a very good option for taking forward positions. But if you want to take this ability, then you have to actually field Sternguard... duh. Now, I have personally not found Sternguard to be as strong or as effective as folks make them out to be. I've never been able to get them in a position to take advantage of their superior fire power, which is probably my fault. But I typically find that a Sternguard unit is just an expensive bullseye that the opponent takes out quickly. I don't know... it's not worked for me yet. Theoretically, you can field up to six Sternguard units using combat squads that you can throw onto the battlefield with your combat squaded tactical units for an impressive 18 scoring units. Yeah, it's fragile, but really, really hard to contain. It's an interesting theory, but seems a bit pricey to be effective in my opinion.
Finally, and most importantly, Kantor has the "Inspiring Presence" special ability. This rule essentially makes Kantor a living Chapter Banner by giving everyone within 12" an additional assault in close combat. That means Kantor is a HUGE force multiplier. I've personally seen the carnage he can inspire even when traveling alongside a humble assault squad. Throw him in or near several even nastier units, like a thunder hammer deathstar or vanguard unit, and Kantor can easily be worth his weight in gold. It is abilities like this one that make a character a TRUE supporting unit by reinforcing your army's ability to fight. In my opinion, this is exactly the way characters should be created.
If you've read the previous paragraph, you can guess what I'm going to say here. Kantor may be able to dish out some impressive harm with his powerfist, but that is not his most effective role on the battlefield. Kantor has a decent sidearm with good range. Use it. If you want to make the best use of Kantor, get him in a position to grant the most units a boost. Surround him with units that are going to make good use of the extra attack, and he can follow up on his own once the armies have whittled themselves down to nothing.
Although I rarely do it myself, one of the most effective ways to use Kantor is to throw him into rhino with a combat squad (for protection once the rhino is toast. That gives you a 12" range from the hull of the vehicle to effect all flanking units. You can slowly walk him up with assault terminators (which gives your opponent a difficult target priority choice), or you can race the rhino forward with flanking assault squads. Either way, you'll be creating a very scary combat knot that your opponent will HAVE to deal with... possibly leaving your poor Sternguard combat squads alone so that they can run around taking objectives. And if you've got the points to spare, you can load him in a landraider for even better protection, and even greater support range.
Kantor is a great special character choice because he can support just about every unit in the game, which is much more than can be said about a lot of other marine characters. And at only 175 points, you can almost guarantee that he will earn his points back just because of the extra attacks he gives your tougher units. If you can imagine the carnage that an extra attack grants to a unit of thunder hammers, or even an assault squad, it is easy to see how you will quickly earn back the points you spent on him in the form of dead enemy combatants. Pedro Kantor is an absolute steal.
Basic Equipment
Like most captains and masters, Kantor wears power armor and has the very important 4+ iron halo. He's also got frag and krak grenades, a power first and an interesting side arm - Dorn's Arrow. The power fist is an interesting choice. It's fluffy, because he is the master of the "Crimson Fists" chapter, but it's also very slow. With a character that has a native Initiative of 5, I'd personally have preferred a power or relic weapon in order to take advantage of his speed. Unfortunately, because he doesn't have any other real close combat option, the power first makes Kantor a bit of a crap shoot in hand-to-hand combat. Yeah, he's going to hit hard, but will he last in order to make that hit? Your best bet is to group him with other marines so that he doesn't assault alone - which is important for other reasons as well. On the positive side, he can literally challenge anything on the battlefield with that fist, although it does mean that the krak grenades are absolutely pointless. As a support character, Kantor is great for last minute smacks on structures and vehicles, but he's probably not the best choice for leading the charge.
The other important weapon in Kantor's personal arsenal is Dorn's Arrow... or 'the magic storm bolter of 4s', as I think of it. This is an Assault 4 S4 AP4 storm bolter with a 24" range. The good thing about this weapon, instead of a fancy pistol, is that it's got the ability to really reach out and touch someone. Further, as he also has a power fist, it doesn't matter that he left his pistol at home. He can fire this puppy off at short or long range, and then charge in... to wait for the faster enemy to slap him around a bit... and then hopefully hit someone with his fist. With four shots, Kantor has essentially got the firepower of a combat squad of marines that he can fire on the move, which is pretty handy. Add in his BS of 5, and he isn't going to miss that often (although I've done it!). At S4, this means you're going to challenge most standard troops units in the game; but at AP4, it isn't going to challenge the troops choices that the native S4 takes advantage of (marines and chaos marines). Personally, I think that this little gem was meant for killing beefy ork nobs and tyrannid warriors, which he can do handily at range. Overall, not a bad weapon. Not a game winner, but still a little better than a standard bolter (or four!).
As a chapter master, Kantor also has access to a very nasty orbital bombardment. While a high strength pie plate should be a boon, it's actually kind of a 'meh'. In an odd twist, you can call in a bombardment and can then turn around and assault in the same turn, but you can't move the turn you use it. That seems a bit backwards. First, the last thing you want to do when you're actually in assault range is to drop a pie plate on the table that you can't reduce with your ballistic skill. The odds of that thing scattering back on you or your unit are just too high. And since you have to assault the thing you shot at, you're very rarely going to actually drop the plate and then assault the same target... unless you're really desperate. On the other hand, this would be the perfect weapon for softening up a target when you drop pod onto the field, or as you swoop across the field in your transport. But you can't do that. So, if you want to use the bombardment, you have to stand still and essentially do nothing for an entire turn. This is an odd choice, and kind of wasted on an assault and movement oriented character like Kantor. Unless you're in a scenario where you can waste a turn sitting on your hands, you might as well forget you have it. Oh well.
Also as a chapter master Kantor permits the use of honor guard units. Unfortunately, while honor guard units are very nasty, all running around with artificer armor, bolters, bolt pistols and power weapons, they are really pricey. Each one costs as much as a terminator, but they have no invulnerable save. At 115 points for just the first three men, this seems a bit excessive and the points would be much better spent on other units that are geared for the same battlefield role. Unless you enjoy hamstringing yourself for fun, there is really no point in throwing these guys onto the field.
Special Abilities
Kantor comes into his own because of his special abilities. First up is "Chapter Tactics" which gives your entire army the Stubborn USR. There are lots of people that feel Stubborn is wasted on marines because they're actually better off falling out of combat and shooting rather than sticking in a fight. I disagree. The most effective way for dealing with assaulting armies, in my opinion, is to tie up the other guy's nasty assault units all game long with small units of marines that just won't die or fall back. The rest of your army can then pick off the enemy's support units and bigger slower monsters trolling the battlefield. But if you're going to do that, you have to stay in the fight! Stubborn will keep you there... provided you can make a few armor saves every turn.
The next special ability is "Hold the Line". This allows all Sternguard units in the army to count as scoring. What this means is you can increase the number of scoring units in your army considerably when a lot of objectives pop up on the field of play. Given the Sternguard's reported ability to hold onto objectives with the support of their special ammo, this is supposed to be a very good option for taking forward positions. But if you want to take this ability, then you have to actually field Sternguard... duh. Now, I have personally not found Sternguard to be as strong or as effective as folks make them out to be. I've never been able to get them in a position to take advantage of their superior fire power, which is probably my fault. But I typically find that a Sternguard unit is just an expensive bullseye that the opponent takes out quickly. I don't know... it's not worked for me yet. Theoretically, you can field up to six Sternguard units using combat squads that you can throw onto the battlefield with your combat squaded tactical units for an impressive 18 scoring units. Yeah, it's fragile, but really, really hard to contain. It's an interesting theory, but seems a bit pricey to be effective in my opinion.
Finally, and most importantly, Kantor has the "Inspiring Presence" special ability. This rule essentially makes Kantor a living Chapter Banner by giving everyone within 12" an additional assault in close combat. That means Kantor is a HUGE force multiplier. I've personally seen the carnage he can inspire even when traveling alongside a humble assault squad. Throw him in or near several even nastier units, like a thunder hammer deathstar or vanguard unit, and Kantor can easily be worth his weight in gold. It is abilities like this one that make a character a TRUE supporting unit by reinforcing your army's ability to fight. In my opinion, this is exactly the way characters should be created.
Using Kantor Effectively
If you've read the previous paragraph, you can guess what I'm going to say here. Kantor may be able to dish out some impressive harm with his powerfist, but that is not his most effective role on the battlefield. Kantor has a decent sidearm with good range. Use it. If you want to make the best use of Kantor, get him in a position to grant the most units a boost. Surround him with units that are going to make good use of the extra attack, and he can follow up on his own once the armies have whittled themselves down to nothing.
Although I rarely do it myself, one of the most effective ways to use Kantor is to throw him into rhino with a combat squad (for protection once the rhino is toast. That gives you a 12" range from the hull of the vehicle to effect all flanking units. You can slowly walk him up with assault terminators (which gives your opponent a difficult target priority choice), or you can race the rhino forward with flanking assault squads. Either way, you'll be creating a very scary combat knot that your opponent will HAVE to deal with... possibly leaving your poor Sternguard combat squads alone so that they can run around taking objectives. And if you've got the points to spare, you can load him in a landraider for even better protection, and even greater support range.
Wrapping Up
Kantor is a great special character choice because he can support just about every unit in the game, which is much more than can be said about a lot of other marine characters. And at only 175 points, you can almost guarantee that he will earn his points back just because of the extra attacks he gives your tougher units. If you can imagine the carnage that an extra attack grants to a unit of thunder hammers, or even an assault squad, it is easy to see how you will quickly earn back the points you spent on him in the form of dead enemy combatants. Pedro Kantor is an absolute steal.
Friday, October 15, 2010
40k: Know Your Space Marines (No. 3): Chaplain Ortan Cassius
Chaplain Cassius is an attempt by GW to create a 'minor' tarpit unit for the space marines. To some degree they succeed, but ultimately there is no getting around the fact that Cassius, at his core, is just a chaplain. In third and fourth edition of the game, that would have meant he was a dangerous close combat character. In the current edition of the codex, however, a chaplain is really just a bump in the road.
Basic Equipment
Cassius has all of the core gear that denotes a chaplain: power armor (3+), a rosarius (4++), bolt pistol and crozius (power weapon). This means he does have, at least the basics, for making him a decent hand to hand opponent. He isn't a crazy assault character, but at least the power weapon gives him a little bite. In addition to the basic chaplain equipment, he also carries 'Infernus' -- a combi-flamer loaded with hellfire shells. Frankly, I find this a little odd. Like Pedro Kantor and Darnath Lysander, GW has opted to create a character that appears to be geared towards one role, and then is given gear or special weapons to perform a different role. This weapon is no different. With the hellfire shells, Cassius is actually a fairly decent shooter. The ability to wound anything on a 2+ is a fairly handy ability. I suppose the combi-flamer portion of that weapon makes at least a little more sense in that he can better soften up targets in an assault... but only the little gribbly units that would actually be affected by it.
Special Abilities
Also like most chaplains, Cassius carries the nefarious liturgies of battle, granting re-rolls to hit on the charge for him and his unit. Once again, a very assault oriented ability that could be devastating in the hands of a full fledged assault unit, but kind of odd for a 'meh' chaplain. But at least it gives him some kind of support role. Also keep in mind that as a chaplain, he also "grants" the Fearless USR to his unit -- which has its positives and negatives; that means his unit won't be slowed down by pinning or morale tests, but the dubious No Retreat! rule is present in the assault. For a space marine with ATSKNF, Fearless is really not as effective as the ability to run away from a lost assault and then only be subject to No Retreat! if the other guy catches you.
The biggest 'special ability' is his boosted toughness. Because of various upgrades and bionic prosthetics, Cassius is literally as 'tough' as a monstrous creature at T6. This means a couple of things: (1) you can't double tap him out with Insta Kill; (2) S3 weapons are useless; (3) your enemy will fear him much more than he needs to. Let's face it, with otherwise basic Chaplain stats, he's only got two wounds. So, in effect, the ability to dodge Insta Kill is kind of pointless. I mean, if you're hitting him with something that hits that hard, you're probably pointing at least two of them in his direction to begin with. I suppose that means he may last into the second round if he is in a squad and you get to spread the wounds around a bit, but in an assault, he's probably going to die anyway. Being immune to S3 is also kind of nice, but once again, there is a whole lot of S4 and above weapons on the battlefield that will be more than effective at bringing him down. I suppose the one good thing about being T6, unlike a monstrous creature, is that Cassius has the invulnerable 4++ save. That means at least half the time he'll be able to shrug off those nasty wounds that would otherwise lay him low. But once again, the kinds of things your opponent will be throwing at him will probably be more than apt at bringing a few wounds to the table.
Using Cassius Effectively
This is a tricky section to write because it's actually kind of hard to use a chaplain effectively in the current edition of the codex. By taking away the Chaplain's third wound and boosted combat stats, GW intentionally toned down the chaplain so that he is no longer a hero on the battlefield. Never mind that toning down the chaplain's abilities is actually contrary to the copious tomes of fluff that have been around for thirty years or so... The re-roll in an assault can be handy, but you're only going to get that on the charge, and it's hard to justify spending 100 points or so on a basic chaplain who isn't going to do much more for you than a veteran marine for a third (or less) of the points. Especially when you can get a basic captain, who has better stats and access to better equipment, for roughly the same price.
I suppose one of Cassius' saving graces is that he is the cheapest of all of the special characters available. You can still get a basic captain, master, chaplain or librarian for cheaper, but I guess it's still something if you just have to bring a special character to the field. With his improved toughness, he does at least have the capability to stick around a little longer than your average "hero" provided you don't throw him at something that hits back too hard. In fact, putting him in a unit of Sternguard is not a bad idea at all as he will blend in very nicely with his hellfire shells, and can contribute to the combi-weapon goodness when it's time to counter-charge the enemy with your veterans. In fact, because the sergeant also has access to a power weapon (preferably a fist), it may give your opponent pause when deciding how to distribute his attacks.
Another decent idea is to throw him into a unit of better assaulters than himself. Vanguard units would be happy to have the extra firepower, and the Fearless ability may be helpful when trying to cross the battlefied. However, because Cassius doesn't have access to a jump pack, he may not be the best choice for a Vanguard unit unless you plan on dropping them with a pod or sticking them into Rhino.
Wrapping Up
Cassius, at his core, is just a chaplain, and chaplains are not an impressive 5th edition codex choice. There are far better choices for the points, and his abilities are generally overestimated by both wielder and defender alike. He should last a bit longer than your average chaplain, at least, and has at least a little bit of sting with his hellfire rounds. If you've got the points to spare, he might be a fun and characterful option, but otherwise, you're probably better off with something else.
Saturday, October 09, 2010
40k: Know Your Space Marines (No. 2): Standard Terminators
Everyone knows that one of the greatest 'Death Star' units in the game is a tooled up unit of Space Marine Assault Terminators with thunder hammers and storm shields. They're tough to kill because they can shrug off any hit or melee attack on a 2+/3++. And when they get in close, they're constantly stunning your characters and vehicles and generally smacking you around with S8 evilness. It's such an obvious choice that people often forget about their more tactically flexible brethren, the stock standard terminator squad. It is pretty clear that the Space Marines were always intended to be THE jack-of-all-trades army in the 40k universe. This is their chief strength (and their most obvious weakness), and I have always felt that playing to that intended role is almost always the most effective approach. After all, being able to change your target or battlefield role on the fly is a tremendous advantage, and one much better demonstrated by a standard terminator over an assault terminator.
Back to Basics
The smallest and cheapest unit of either version of terminator you can buy is 200 points for a 5 man unit. For the standard terminator squad, that's 4 marines with storm bolters and power fists, and 1 with a power sword and storm bolter. Their fantastic 2+ armor save means that they will shrug off every basic weapon on the battlefield on a 2+ and they only need to fear special and heavy weapons (as those weapons tend to turn the pinnacle of Imperial personal protective gear into a guardsman flak jacket). But even with their out-of-the-box weaponry, they're going to have a 30" threat range (24" for the gun + 6" movement), and all but one will be able to hit just as hard as their thunder hammer brethren at S8. The sergeant, unfortunately, can only ever take a power sword into battle. The good thing about this is that you have at least a passing chance to eliminate the other guy's power fist before he tears into your terminators. The bad thing about it is really due to the confusion it causes more than anything else: you see, every other Space Marine sergeant has at least one swap option for weapons which allow him to hit heavier or faster in an assault. But for some reason, the Codex Astartes provides that the toughest veteran sergeants in the chapter must wield a very specific load out while every other sergeant, from devastators to scouts, can take pretty much whatever they want into battle. Maybe the slower speed of the terminator armor means they can't make it into the armory fast enough before all of the good stuff has been picked over? Anyway, the pros and cons of this basic stock unit are as follows:
Pros
Reasonable Upgrades
Powerful hand-to-hand attacks and 10 bolter shots per round of shooting is really nothing to sneeze at when you stop to think about it, but if you want these guys to live up to their full jack-of-all-trades potential, they need some basic upgrades to extend their menacing presence on the battlefield. For the cost of another terminator (40 pts), you can dramatically increase this squad's killing potential: cyclone missile launcher (30 pts) and 2x chain fists (5 pts each). This does three very important things.
First, by adding the chain fists, there is NO vehicle or bunker that is safe if you can get to grips with it. With an additional D6 to roll for armor penetration, that means you go from a minimum of S9 (S8 + D6 result of 1) to a minimum of S10 (S8 + 2x D6 result of 1). Yep, that means you are going to automatically cause at least a glancing blow on most armor in the game. And with a maximum of S20, that means on average you will be able to penetrate the toughest bunkers and armor in the game (unless it has living metal, of course, but we won't go into that ridiculous rule at the moment...). To put it into perspective, a chain fist hits armor just as hard as a meltagun, but without the AP1 rating. The long and short of it is that armor doesn't stand a chance against your little 5 man unit -- that's 6 S8 power fist attacks and 6 chain fist attacks on the charge; good luck surviving that!
Second, with the simple addition of a cyclone launcher you extend the threat range of this unit to 54" -- 48" plus 6" of movement (all hail to the Relentless USR!). Playing long edge to long edge on a standard 4x6 gaming board means that you will be able to reach just about everything on the board without needing to 'gate' around with a librarian or jumping into an expensive landraider transport. Further, because this edition of the Space Marine codex lets you shoot two missiles every turn, in addition to firing the storm bolter, your firepower increases beyond that of the standard tactical squad in the blink of an eye.
Finally, the addition of these two pieces of equipment creates four pockets of wound allocation: 2x marines with SB/PF; 2x marines with SB/CF; 1x sergeant with SB/PW; and 1x marine with SB/PF/Cyclone. Given their lame invulnerable save (compared to the storm shield), this is important for keeping your cyclone launchers and chain fists the best chance possible against a fusillade of fire from the other side. Incidentally, I find it a little bizarre that that the same people that hail the psychic power 'force dome' as a "must have" also seem to agree that the terminator's invulnerable save is crap. Which is it folks? Either the 5++ is great, or it sucks. I think it sucks. But I digress...
When you compare this 40 point addition to the equivalent of adding another warm body to a thunder hammer unit, this first 40 point upgrade dramatically increase the unit's effectiveness at a much faster rate. At first glance, this rate of return appears to dissipate over time as you increase the unit's size from 5 to 10 men. With 4 chain fists and 2 cyclone launchers (allowing you to create nasty bookend combat squads, or a single unit with massive firepower), the cost of a full blown unit at 480 points is a bit steeper than the 400 points a(n) (arguably) more survivable full size thunder hammer unit. However, when you really sit down and think about it, I'm not convinced 400 points is the true cost of a full blown assault unit, but I'll get into that in a minute.
Obligatory Comparison
Because of the ubiquitous nature of the thunder hammer 'Death Star,' I don't suppose there is any way to discuss standard terminators without an obligatory comparison to their nasty assault oriented brethren. So, let's go there...
First, let's look at the threat range of your reasonably upgraded standard unit to an equally priced 6 man assault terminator unit (both at 240 pts). As stated above, a unit of terminators with a cyclone launcher has an impressive 54" range. That's enough to reach out and smack just about anyone on the board at any given time. A foot slogging thunder hammer unit can only hit you if you're within 12": a 6" movement and another 6" on the charge. You can extend that with a landraider, but that also increases your overall cost by at least 240 points if you buy the Redeemer chassis. As I referenced above, the true cost of thunder hammer terminators should probably include a mode of transportation -- either a 'gate' powered librarian (probably in terminator armor with a storm shield of his own at 140 points) or a 240+ point landraider that can only take 6 men into battle at a time. Incidentally, a 6 man unit with stripped down Redeemer costs the same amount of points as a full size unit of terminators with dual cyclone launchers and 4 armor-breaching chain fists.
Next, let's look at a Deep Strike comparison. You can drop either unit close to the enemy -- and in the case of the thunder hammer unit, if you don't drop them in, you're going to have a loooong walk, or a transport ride for a smaller number of marines. Anyway, on the deep strike, a thunder hammer unit will probably "run" to avoid template fury and then pose menacingly; they might even snarl, gnash their teeth and let loose with a biting insult or two. The standard 5 man terminator unit, however, will pop in and then stand in place to unload two tactical squad's worth of dakka into the enemy. Twenty bolter rounds and two missiles is nothing to sneeze at! And if the enemy chooses to run away from you rather than standing to accept the charge on the next turn, your standard terminators will continue to blast away at the enemy with two tactical squads worth of firepower from behind every turn while the assault terminators will jog behind the enemy continuing to pose menacingly and hurl hurtful language.
How about the assault phase? Well, there is no doubt that thunder hammer marines have an impressive ability to lay the smack down in an assault. Let's up the ante and consider maximum sized units. A full size 10 man assault unit can lambast the enemy with 30 S8 hits on the charge, and 20 hits thereafter. Further, even at I1 (because of those slow menacing hammers), their 3++ storm shields and 2+ armor mean that most of those hammers are going to survive to hit the enemy again and again during every subsequent round of combat.
Conversely, a 10 man standard terminator unit will hit you with 27 S8 hits and 3 S4 hits on the charge, and then 16 S8 hits and 2 S4 hits thereafter. That's still nothing to sneeze at, but only the S4 hits are at I4. I4 is ok for most enemies, but against faster armies and power weapon wielding characters, the S4 might as well be hitting at I1 simply because he won't be hitting until after the other guy has done his damage anyway -- which is a good argument for letting the sergeant take a fist of his own. Unlike the assault terminators with their shields, however, standard terminators are not nearly as survivable. Their 2+ save will keep them safe from regular close combat attacks, but power weapons, rending attacks and monstrous creatures will quickly whittle down standard terminators in each assault phase. In short, the standard terminators just aren't as survivable against dangerous melee units in the assault phase -- even if they can dish out nearly the same amount of pain. Note that I didn't mention anything about the stun ability of the hammer (i.e. anyone wounded by the hammer, but not killed, strikes at I1 in the next phase). But let's face it, if you just hit something with 30 hammer blows and it lived to strike in the next round... you're probably in trouble.
But let's stand back for a moment and also consider the shooting phase before the assault. Those thunder hammers are survivable, but other than harsh language, they don't have anything to soften up the assault before they go charging in (unless they've got a librarian in tow). The standard terminators have two tactical squads worth of firepower to unload before charging in. That firepower WILL take its toll on your target. Sure, your standard terminators won't last long against a squad full of power weapons, but the ability to unload that much firepower into the other guy before the charge means that they won't have to survive as many attacks from the enemy. I won't go mathhammer crazy here, but my gut tells me that the firepower is the great equalizer here: even if the enemy survives the fusillade of fire, they won't be nearly as dangerous once the melee is joined.
Since we're talking about melee, what about armor? There is no doubt that people fear the hammer. After all, even if you only manage to dent the armor or knock off a weapon on the charge, you also shake the crew/occupants. And at S9 as your base when you throw in the D6 roll, there isn't much you won't glance or penetrate. But also keep in mind that all those power fists can do the exact same thing (minus the auto-shake). But once you throw in those chain fists, however, the difference becomes crystal clear. With that additional D6 roll, you will auto-glance most armor just by picking up the dice. Further, while the thunder hammer can glance a landraider or bunker on a roll of six, a chain fist will glance or penetrate more than half the time... statistically. And with four in your squad, that's an impressive 12 bone-jarring chain hits on the charge, with an average 6 penetrating hits and 4 glances. Compare that to an average of just 5 glancing hits from all 10 thunder hammers in the assault unit. And keep in mind, those 12 chain hits don't even consider the 15 power fist attacks which will, on average, give you another 2.5 glancing blows. Clearly the standard terminators, even with just four chain fists (at a total of 20 points), is vastly superior for cracking bunkers and landraiders -- heck, they're superior at cracking any armor. Do people really consider that? Probably not.
Breaking things down, the standard terminators hit armor harder, hit almost as hard in close combat against everything else, and have a vastly superior threat range on the board. Further, because they can reach out and hit most things on the board without having to load up in a transport or deepstriking into enemy territory, they can make their presence felt during nearly every turn of the game instead of jockeying into position for a round or two of close combat. So, what does all of this boil down to? As long as you are mindful of taking advantage of cover when the other guy has lots of AP 1/2 weapons on the board, the stock terminators are actually superior to assault marines in almost every other way. They are much more likely to cause harm to the enemy during every turn, and with just a passing consideration for cover saves, are just as survivable in most situations.
Load Out Options
Unlike the sergeant, the standard terminator has a few options to consider. For every five terminators, you can take either a cyclone missile launcher, and assault cannon, or a heavy flamer. Further, all terminators, except the sergeant, can decide to take either a power fist or a chain fist. As I hope that I've pointed out above, the chain fist is valuable for two reasons: it creates the ability to allocate wounds in the squad, and it gives you a near meltagun ability to punch through armor. At 5 points each, they are not horribly expensive, but it is easy to over-do it if you aren't careful. I find that a 2 to 3 ratio of chain fists to power fists is more than enough. That is, for every three power fists (or power swords), throw in a couple of chain fists. I highly doubt you'll ever need more than 4 in a squad, as that's approximately 12 meltagun shots on the charge -- which is more melta-dakka than is possible in any other unit in the game. Trust me, that's plenty -- any more than that is just gilding the lilly; not to mention that you're taking away precious points for the rest of your army.
The real question is which heavy weapon to take. For 30 points, you can take either an assault cannon or a cyclone launcher. Both have their uses, but I personally lean more towards the cyclone launcher - but only because of its range. The assault cannon may give you four S6 shots (that rend on a 6), but a cyclone gives you four shots too: two S4 storm bolter rounds, and two shots at either S8 as krak missiles, or S4 as frag blasts. Further, let's also remember that the assault cannon does not do anything to increase your squad's threat range. 30" is nothing to sneeze at, but it pales in comparison to the 54" of the cyclone launcher. Sure 30" will keep you in range for most of the game, but that 54" can almost guarantee that you're going to have something to shoot at during every turn f the game. For an expensive unit like this, I prefer to give them every chance possible to earn their points back. Mathhammer says the following:
Against T6 monstrous creatures with a 3+ armor save:
Assault Cannon: 0.74 unsaved wounds
Cyclone/Storm Bolter: 0.37 + 0.07 = 0.44 unsaved wounds
Cyclone/Storm Bolter: 1.11 + 0.67 = 1.78 unsaved wounds
Note that the Gaunt calculation does not consider the use of frag missiles. If frag missiles are used, then it is very possible that the cyclone setup is better -- assuming you hit at least two gaunts with every missile shot. You can factor in the size of the target area in square inches to determine an acceptable angle of deviation, but there are so many other factors (such as the distance between enemy bases and the formation of the enemy unit) that it is pointless to make assumptions that can calculate real world applications in a given game.
Against MEQ:
Assault Cannon: 1.04 unsaved wounds
Cyclone/Storm Bolter: 0.37 + 0.22 = 0.59 unsaved wounds
Against Armor 10:
Assault Cannon:
0.38 Shaken;
0.23 Stunned;
0.23 Weap.Dest.;
0.23 Immobile;
0.16 Wrecked;
0.16 Explodes
Cyclone/Storm Bolter:
0.26 + 0.11 = 0.37 Shaken;
0.19 + 0.04 = 0.23 Stunned;
0.19 + 0.04 = 0.23 Weap.Dest.;
0.19 + 0.04 = 0.23 Immobile;
0.15 + 0.00 = 0.15 Wrecked;
0.15 + 0.00 = 0.15 Explodes
Note that while the cyclone set up is almost as good as the assault cannon against armor 10, the harder the armor gets, the better the assault cannon does overall because the bolter can no longer glance.
As much as I'd like to say that the cyclone setup is the superior weapon in any given situation, the truth is that the assault cannon is better in most categories -- but only once you get within 24" of the enemy. The truth is, you get an extra 2 feet of range by using the cyclone launcher, which means you can probably do just as well with that cyclone when you throw in the additional wounds in can cause over the course of a game.
Unfortunately, it is nearly as impossible to determine how much more often you will be able to use your cyclone over the assault cannon in the course of any given game, so you'll just have to use your own experience to determine if you spend more time within 24" range or 54" range in your typical games.
The other option available is the heavy flamer. At close range, this heavy bolter strength weapon removes armor saves and can hit as many gribblies as you can fit under the template. Against horde armies with poor armor, this weapon can be devastating, but it also means you are very close to the enemy. In a perfect world, the heavy flamer would be a better option for an assault terminator squad (can you imagine the carnage you could dish out if you could take a storm shield and heavy flamer in a thunder hammer unit!). But it isn't an option. As it stands, we've already established that standard terminators are not as survivable in close combat, and can only hold their own against non-power weapon/rending/monstrous opponents in combat.
Fortunately, those are the kinds of enemies the heavy flamer was intended to take out in large groups... but you're still flirting with disastrous territory by getting that close to the bad guy. Standard terminators are deadly at the 18" to 30" range from the enemy, but they start to lose their appeal once the bad guy closes in for a massed assault. You're better off, in my opinion, avoiding the kinds of ranges where a heavy flamer excels. At 5 points, it's not a bad upgrade option if you've got points to spare, but not enough for a serious heavy weapon like the assault cannon or cyclone, but generally speaking I think I'd prefer to throw in another chain fist.
Wrap Up
There are not many folks that speak highly of the standard terminator squad, but personally... I think those same folks are nuts. The threat radius of a standard terminator squad is huge, and they carry an impressive amount of firepower. Because they are relentless, a standard squad can boast a two to four foot threat radius that is constantly on the move. Compare that to the measly one foot radius of the thunder hammer unit, and the reality of target opportunity is pretty clear. Further, in a planetsrike game, or when you know you're going to be facing serious amounts of armor or bunkers, nothing will allow you to get to the soft creamy center of the bad guy quite as well as a chainfist. Point for point, you can simply put more effective terminators on the field in a standard squad than a thunder hammer unit. No, standard terminator squads are not a Death Star threat, but they have serious tactical flexibility and can put rounds down range every turn of the game. That is an important difference that can not be overstated.
Back to Basics
The smallest and cheapest unit of either version of terminator you can buy is 200 points for a 5 man unit. For the standard terminator squad, that's 4 marines with storm bolters and power fists, and 1 with a power sword and storm bolter. Their fantastic 2+ armor save means that they will shrug off every basic weapon on the battlefield on a 2+ and they only need to fear special and heavy weapons (as those weapons tend to turn the pinnacle of Imperial personal protective gear into a guardsman flak jacket). But even with their out-of-the-box weaponry, they're going to have a 30" threat range (24" for the gun + 6" movement), and all but one will be able to hit just as hard as their thunder hammer brethren at S8. The sergeant, unfortunately, can only ever take a power sword into battle. The good thing about this is that you have at least a passing chance to eliminate the other guy's power fist before he tears into your terminators. The bad thing about it is really due to the confusion it causes more than anything else: you see, every other Space Marine sergeant has at least one swap option for weapons which allow him to hit heavier or faster in an assault. But for some reason, the Codex Astartes provides that the toughest veteran sergeants in the chapter must wield a very specific load out while every other sergeant, from devastators to scouts, can take pretty much whatever they want into battle. Maybe the slower speed of the terminator armor means they can't make it into the armory fast enough before all of the good stuff has been picked over? Anyway, the pros and cons of this basic stock unit are as follows:
Pros
- 30" standard threat range
- 2+ armor shrugs off most attacks
- 5++ invulnerable save gives them a guardsman's chance in Hades to survive powerful hits
- S8 melee hits standard for troopers in the unit
- "Free" power weapon for the sergeant
- 10 bolter shots on the move give them the un-augmented firepower of a standard full size tactical squad
- Although just as expensive as a 5 man assault terminator squad, your foe will always prefer to take shots at the other squad before this one if he's got a choice -- this unit appears non-threatening because they're slow
- 5++ invulnerable save gives them a guardsman's chance in Hades to survive powerful hits
- Sergeant has NO access to the chapter armory
- Expensive
- Too slow to chase down fleeing hand-to-hand combatants
Reasonable Upgrades
Powerful hand-to-hand attacks and 10 bolter shots per round of shooting is really nothing to sneeze at when you stop to think about it, but if you want these guys to live up to their full jack-of-all-trades potential, they need some basic upgrades to extend their menacing presence on the battlefield. For the cost of another terminator (40 pts), you can dramatically increase this squad's killing potential: cyclone missile launcher (30 pts) and 2x chain fists (5 pts each). This does three very important things.
First, by adding the chain fists, there is NO vehicle or bunker that is safe if you can get to grips with it. With an additional D6 to roll for armor penetration, that means you go from a minimum of S9 (S8 + D6 result of 1) to a minimum of S10 (S8 + 2x D6 result of 1). Yep, that means you are going to automatically cause at least a glancing blow on most armor in the game. And with a maximum of S20, that means on average you will be able to penetrate the toughest bunkers and armor in the game (unless it has living metal, of course, but we won't go into that ridiculous rule at the moment...). To put it into perspective, a chain fist hits armor just as hard as a meltagun, but without the AP1 rating. The long and short of it is that armor doesn't stand a chance against your little 5 man unit -- that's 6 S8 power fist attacks and 6 chain fist attacks on the charge; good luck surviving that!
Second, with the simple addition of a cyclone launcher you extend the threat range of this unit to 54" -- 48" plus 6" of movement (all hail to the Relentless USR!). Playing long edge to long edge on a standard 4x6 gaming board means that you will be able to reach just about everything on the board without needing to 'gate' around with a librarian or jumping into an expensive landraider transport. Further, because this edition of the Space Marine codex lets you shoot two missiles every turn, in addition to firing the storm bolter, your firepower increases beyond that of the standard tactical squad in the blink of an eye.
Finally, the addition of these two pieces of equipment creates four pockets of wound allocation: 2x marines with SB/PF; 2x marines with SB/CF; 1x sergeant with SB/PW; and 1x marine with SB/PF/Cyclone. Given their lame invulnerable save (compared to the storm shield), this is important for keeping your cyclone launchers and chain fists the best chance possible against a fusillade of fire from the other side. Incidentally, I find it a little bizarre that that the same people that hail the psychic power 'force dome' as a "must have" also seem to agree that the terminator's invulnerable save is crap. Which is it folks? Either the 5++ is great, or it sucks. I think it sucks. But I digress...
When you compare this 40 point addition to the equivalent of adding another warm body to a thunder hammer unit, this first 40 point upgrade dramatically increase the unit's effectiveness at a much faster rate. At first glance, this rate of return appears to dissipate over time as you increase the unit's size from 5 to 10 men. With 4 chain fists and 2 cyclone launchers (allowing you to create nasty bookend combat squads, or a single unit with massive firepower), the cost of a full blown unit at 480 points is a bit steeper than the 400 points a(n) (arguably) more survivable full size thunder hammer unit. However, when you really sit down and think about it, I'm not convinced 400 points is the true cost of a full blown assault unit, but I'll get into that in a minute.
Obligatory Comparison
Because of the ubiquitous nature of the thunder hammer 'Death Star,' I don't suppose there is any way to discuss standard terminators without an obligatory comparison to their nasty assault oriented brethren. So, let's go there...
First, let's look at the threat range of your reasonably upgraded standard unit to an equally priced 6 man assault terminator unit (both at 240 pts). As stated above, a unit of terminators with a cyclone launcher has an impressive 54" range. That's enough to reach out and smack just about anyone on the board at any given time. A foot slogging thunder hammer unit can only hit you if you're within 12": a 6" movement and another 6" on the charge. You can extend that with a landraider, but that also increases your overall cost by at least 240 points if you buy the Redeemer chassis. As I referenced above, the true cost of thunder hammer terminators should probably include a mode of transportation -- either a 'gate' powered librarian (probably in terminator armor with a storm shield of his own at 140 points) or a 240+ point landraider that can only take 6 men into battle at a time. Incidentally, a 6 man unit with stripped down Redeemer costs the same amount of points as a full size unit of terminators with dual cyclone launchers and 4 armor-breaching chain fists.
Next, let's look at a Deep Strike comparison. You can drop either unit close to the enemy -- and in the case of the thunder hammer unit, if you don't drop them in, you're going to have a loooong walk, or a transport ride for a smaller number of marines. Anyway, on the deep strike, a thunder hammer unit will probably "run" to avoid template fury and then pose menacingly; they might even snarl, gnash their teeth and let loose with a biting insult or two. The standard 5 man terminator unit, however, will pop in and then stand in place to unload two tactical squad's worth of dakka into the enemy. Twenty bolter rounds and two missiles is nothing to sneeze at! And if the enemy chooses to run away from you rather than standing to accept the charge on the next turn, your standard terminators will continue to blast away at the enemy with two tactical squads worth of firepower from behind every turn while the assault terminators will jog behind the enemy continuing to pose menacingly and hurl hurtful language.
How about the assault phase? Well, there is no doubt that thunder hammer marines have an impressive ability to lay the smack down in an assault. Let's up the ante and consider maximum sized units. A full size 10 man assault unit can lambast the enemy with 30 S8 hits on the charge, and 20 hits thereafter. Further, even at I1 (because of those slow menacing hammers), their 3++ storm shields and 2+ armor mean that most of those hammers are going to survive to hit the enemy again and again during every subsequent round of combat.
Conversely, a 10 man standard terminator unit will hit you with 27 S8 hits and 3 S4 hits on the charge, and then 16 S8 hits and 2 S4 hits thereafter. That's still nothing to sneeze at, but only the S4 hits are at I4. I4 is ok for most enemies, but against faster armies and power weapon wielding characters, the S4 might as well be hitting at I1 simply because he won't be hitting until after the other guy has done his damage anyway -- which is a good argument for letting the sergeant take a fist of his own. Unlike the assault terminators with their shields, however, standard terminators are not nearly as survivable. Their 2+ save will keep them safe from regular close combat attacks, but power weapons, rending attacks and monstrous creatures will quickly whittle down standard terminators in each assault phase. In short, the standard terminators just aren't as survivable against dangerous melee units in the assault phase -- even if they can dish out nearly the same amount of pain. Note that I didn't mention anything about the stun ability of the hammer (i.e. anyone wounded by the hammer, but not killed, strikes at I1 in the next phase). But let's face it, if you just hit something with 30 hammer blows and it lived to strike in the next round... you're probably in trouble.
But let's stand back for a moment and also consider the shooting phase before the assault. Those thunder hammers are survivable, but other than harsh language, they don't have anything to soften up the assault before they go charging in (unless they've got a librarian in tow). The standard terminators have two tactical squads worth of firepower to unload before charging in. That firepower WILL take its toll on your target. Sure, your standard terminators won't last long against a squad full of power weapons, but the ability to unload that much firepower into the other guy before the charge means that they won't have to survive as many attacks from the enemy. I won't go mathhammer crazy here, but my gut tells me that the firepower is the great equalizer here: even if the enemy survives the fusillade of fire, they won't be nearly as dangerous once the melee is joined.
Since we're talking about melee, what about armor? There is no doubt that people fear the hammer. After all, even if you only manage to dent the armor or knock off a weapon on the charge, you also shake the crew/occupants. And at S9 as your base when you throw in the D6 roll, there isn't much you won't glance or penetrate. But also keep in mind that all those power fists can do the exact same thing (minus the auto-shake). But once you throw in those chain fists, however, the difference becomes crystal clear. With that additional D6 roll, you will auto-glance most armor just by picking up the dice. Further, while the thunder hammer can glance a landraider or bunker on a roll of six, a chain fist will glance or penetrate more than half the time... statistically. And with four in your squad, that's an impressive 12 bone-jarring chain hits on the charge, with an average 6 penetrating hits and 4 glances. Compare that to an average of just 5 glancing hits from all 10 thunder hammers in the assault unit. And keep in mind, those 12 chain hits don't even consider the 15 power fist attacks which will, on average, give you another 2.5 glancing blows. Clearly the standard terminators, even with just four chain fists (at a total of 20 points), is vastly superior for cracking bunkers and landraiders -- heck, they're superior at cracking any armor. Do people really consider that? Probably not.
Breaking things down, the standard terminators hit armor harder, hit almost as hard in close combat against everything else, and have a vastly superior threat range on the board. Further, because they can reach out and hit most things on the board without having to load up in a transport or deepstriking into enemy territory, they can make their presence felt during nearly every turn of the game instead of jockeying into position for a round or two of close combat. So, what does all of this boil down to? As long as you are mindful of taking advantage of cover when the other guy has lots of AP 1/2 weapons on the board, the stock terminators are actually superior to assault marines in almost every other way. They are much more likely to cause harm to the enemy during every turn, and with just a passing consideration for cover saves, are just as survivable in most situations.
Load Out Options
Unlike the sergeant, the standard terminator has a few options to consider. For every five terminators, you can take either a cyclone missile launcher, and assault cannon, or a heavy flamer. Further, all terminators, except the sergeant, can decide to take either a power fist or a chain fist. As I hope that I've pointed out above, the chain fist is valuable for two reasons: it creates the ability to allocate wounds in the squad, and it gives you a near meltagun ability to punch through armor. At 5 points each, they are not horribly expensive, but it is easy to over-do it if you aren't careful. I find that a 2 to 3 ratio of chain fists to power fists is more than enough. That is, for every three power fists (or power swords), throw in a couple of chain fists. I highly doubt you'll ever need more than 4 in a squad, as that's approximately 12 meltagun shots on the charge -- which is more melta-dakka than is possible in any other unit in the game. Trust me, that's plenty -- any more than that is just gilding the lilly; not to mention that you're taking away precious points for the rest of your army.
The real question is which heavy weapon to take. For 30 points, you can take either an assault cannon or a cyclone launcher. Both have their uses, but I personally lean more towards the cyclone launcher - but only because of its range. The assault cannon may give you four S6 shots (that rend on a 6), but a cyclone gives you four shots too: two S4 storm bolter rounds, and two shots at either S8 as krak missiles, or S4 as frag blasts. Further, let's also remember that the assault cannon does not do anything to increase your squad's threat range. 30" is nothing to sneeze at, but it pales in comparison to the 54" of the cyclone launcher. Sure 30" will keep you in range for most of the game, but that 54" can almost guarantee that you're going to have something to shoot at during every turn f the game. For an expensive unit like this, I prefer to give them every chance possible to earn their points back. Mathhammer says the following:
Against T6 monstrous creatures with a 3+ armor save:
Assault Cannon: 0.74 unsaved wounds
Cyclone/Storm Bolter: 0.37 + 0.07 = 0.44 unsaved wounds
Against Gaunts:
Assault Cannon: 2.22 unsaved woundsCyclone/Storm Bolter: 1.11 + 0.67 = 1.78 unsaved wounds
Note that the Gaunt calculation does not consider the use of frag missiles. If frag missiles are used, then it is very possible that the cyclone setup is better -- assuming you hit at least two gaunts with every missile shot. You can factor in the size of the target area in square inches to determine an acceptable angle of deviation, but there are so many other factors (such as the distance between enemy bases and the formation of the enemy unit) that it is pointless to make assumptions that can calculate real world applications in a given game.
Against MEQ:
Assault Cannon: 1.04 unsaved wounds
Cyclone/Storm Bolter: 0.37 + 0.22 = 0.59 unsaved wounds
Against Armor 10:
Assault Cannon:
0.38 Shaken;
0.23 Stunned;
0.23 Weap.Dest.;
0.23 Immobile;
0.16 Wrecked;
0.16 Explodes
Cyclone/Storm Bolter:
0.26 + 0.11 = 0.37 Shaken;
0.19 + 0.04 = 0.23 Stunned;
0.19 + 0.04 = 0.23 Weap.Dest.;
0.19 + 0.04 = 0.23 Immobile;
0.15 + 0.00 = 0.15 Wrecked;
0.15 + 0.00 = 0.15 Explodes
Note that while the cyclone set up is almost as good as the assault cannon against armor 10, the harder the armor gets, the better the assault cannon does overall because the bolter can no longer glance.
As much as I'd like to say that the cyclone setup is the superior weapon in any given situation, the truth is that the assault cannon is better in most categories -- but only once you get within 24" of the enemy. The truth is, you get an extra 2 feet of range by using the cyclone launcher, which means you can probably do just as well with that cyclone when you throw in the additional wounds in can cause over the course of a game.
Unfortunately, it is nearly as impossible to determine how much more often you will be able to use your cyclone over the assault cannon in the course of any given game, so you'll just have to use your own experience to determine if you spend more time within 24" range or 54" range in your typical games.
The other option available is the heavy flamer. At close range, this heavy bolter strength weapon removes armor saves and can hit as many gribblies as you can fit under the template. Against horde armies with poor armor, this weapon can be devastating, but it also means you are very close to the enemy. In a perfect world, the heavy flamer would be a better option for an assault terminator squad (can you imagine the carnage you could dish out if you could take a storm shield and heavy flamer in a thunder hammer unit!). But it isn't an option. As it stands, we've already established that standard terminators are not as survivable in close combat, and can only hold their own against non-power weapon/rending/monstrous opponents in combat.
Fortunately, those are the kinds of enemies the heavy flamer was intended to take out in large groups... but you're still flirting with disastrous territory by getting that close to the bad guy. Standard terminators are deadly at the 18" to 30" range from the enemy, but they start to lose their appeal once the bad guy closes in for a massed assault. You're better off, in my opinion, avoiding the kinds of ranges where a heavy flamer excels. At 5 points, it's not a bad upgrade option if you've got points to spare, but not enough for a serious heavy weapon like the assault cannon or cyclone, but generally speaking I think I'd prefer to throw in another chain fist.
Wrap Up
There are not many folks that speak highly of the standard terminator squad, but personally... I think those same folks are nuts. The threat radius of a standard terminator squad is huge, and they carry an impressive amount of firepower. Because they are relentless, a standard squad can boast a two to four foot threat radius that is constantly on the move. Compare that to the measly one foot radius of the thunder hammer unit, and the reality of target opportunity is pretty clear. Further, in a planetsrike game, or when you know you're going to be facing serious amounts of armor or bunkers, nothing will allow you to get to the soft creamy center of the bad guy quite as well as a chainfist. Point for point, you can simply put more effective terminators on the field in a standard squad than a thunder hammer unit. No, standard terminator squads are not a Death Star threat, but they have serious tactical flexibility and can put rounds down range every turn of the game. That is an important difference that can not be overstated.
Subscribe to:
Posts (Atom)