Below is a
fantastic article put together by Ron at his awesome
From the Warp blog that I'm posting here in case you missed it at its original location. As usual, I am re-posting his work, without permission, but I strongly suggest that you visit his site for some other great articles; his stuff is consistently top-notch. I have added some of my own comments at the bottom with regard to my own approach. I just wish he'd put this up
before I magnetized a couple of pods on my own...
The definitive guide to building and magnetizing a Space Marine Drop pod

If you've never built one of these before, you owe to yourself to do some research before you get underway.
There are a few things you need to know before you put glue to plastic.
Magnetizing is an added benefit, not necessary, but definitely nice to do.
This tutorial covers the basic construction and magnetizing of the doors
and both weapons for the drop pod. You can skip the magnetizing parts
and still use all the info here to build your pod.
Believe me, reading this before you attempt to build your own will help
you out tremendously. I wish I had it before I started mine. Make sure
to read through the whole thing before attempting it though. While it's
presented in the order you should do things, there is some room to move
things around and depending on what tools you have available, you may
need to do just that.
The follow up to this post will be the painting of the same pod. The
construction of this is designed to allow easy painting of the final
three sub-assemblies so that you can get into all the tight spaces
fairly quickly and easily with the last step being to glue the three
components together.
Start by cutting and cleaning everything
Start out by making sure you have all your pieces and your tools. If
you're magnetizing this, you'll need a few more things in addition to
your clippers, files and glue. I use 1/8 inch rare earth magnets for my
work. I've got a 1/8 drill bit that I use to create the perfect size
hole for the magnets to rest comfortably in. This project requires 13
magnets when all said and done.
I've found it easiest to clip everything from the sprue and take care of
all my mold lines. Once I have everything ready, then I start building.
We're going to build three sub-assemblies. The inner harness assembly, the floor and doors and the engine/fin assembly.
The inner harness assembly
This is perhaps the most important thing of the whole project.
Understanding this little tidbit matters. Unfortunately, GW is not that
clear in their directions and most of us have figured this out by trial
and error.
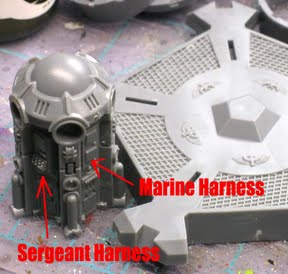
The
center console itself can sit on the floor base facing any direction.
The key is getting the components of the Sergent's individual harness
correct.
To do that, we need to know what components make up the Sergeant harness.
On the center console itself, it will be the one panel that has the
keypad and readout screen and not just two blank spots. The blanks spots
are all the Marine harness points.
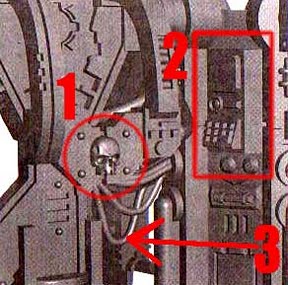
GW provides this tiny picture in the instructions but no real explanation as to why it's there.
There are three things you need to note about the drawing.
1. The Sergeant shoulder harness is the one with the skull. The rest have round blanks in the same position.
2. That particular harness/upright assembly needs to plug into that particular panel on the center console.
3. The Sergeant also has a specific upright piece as well and it can be
determined by the low hanging cable that none of the other uprights
have.
If you try and fit any other harness into the Sergeant upright, you'll
notice that you'll have considerable trouble. This is because the pegs
for his particular shoulder harness are made to fit into his particular
upright piece. Get this correct and the rest is a piece of cake.
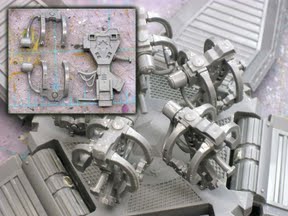
You can see each "harness" is actually two (one on each side) and an upright in the middle.
I built all of my harnesses and then attached them to the console making
sure to put the Sergeant harness next to the correct panel on the
console.
In the picture there, I have them resting on the floor piece, but they are NOT glued in place yet to the floor.
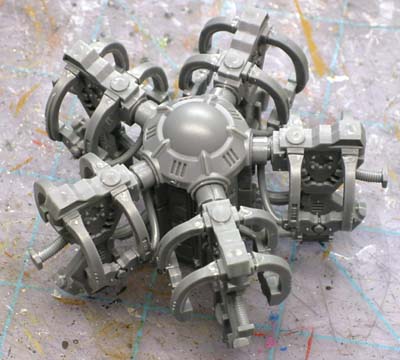
And the completed inner harness assembly. Each harness has been glued
into the console. This part is done now. We can set it aside for later
on.
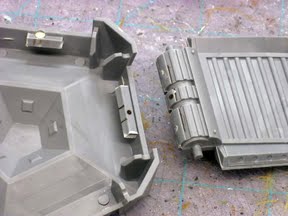
The floor and doors
The majority of the work here is due to the fact that I magnetized the
doors. Drop that option and you should be able to cruise through this
portion with ease. The first thing is to build each door by gluing the
halves together.
I elected to magnetize the doors in such a way that the magnet is not obvious and positioned at the tip of the door when opened.
I wanted to keep the doors upright, but did not want them to close so tightly that it would be difficult to get the open either.
The drawback to this method is that the magnets are positioned in such a
way that if they do break, it will be almost impossible to repair.
They should not need to be repaired I believe with normal use, but it's
worth noting and being aware of it if that is a big concern when
building your own pod.
We start by gluing a small piece of sprue (narrow end upright) just a
millimeter or two from the edge of each door opening. Mark the middle of
it along with the middle of your door. It's best to place the door in
the frame to see how it all lines up.
The magnet will go in the door itself just above the seam between the
two halves as seen in the picture. The line up between both magnets does
not need to be perfect, but you want to get it as close as possible.
Also make sure that your magnets are flush with the surface they are
embedded in. There is not a lot of wiggle room here and it pays to get
as close as possible.
Drill your hole in each piece and secure your magnet to each half.
I don't think I need to remind everyone about magnet polarity. If you
get it wrong, you'll need some creative cutting to extract the snugly
glued in place magnet.
Once you have all the doors done this way, you can test them out to see how they work.
There should be just enough draw between the magnets that the door will
"pop" into the upright position when it gets close, but not so much that
it can't easily be pulled away.

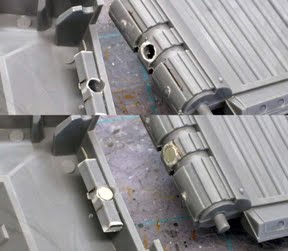
Here you can see how the finished door will look. The magnet is barely visible in the open position.
When closed, you can see how the two magnets line up (this is prior to the floor being glued in place).
You'll want to make sure all of your doors are functioning correctly
prior to gluing the floor decking in place. Once it's down, you can't
make any more adjustments.
Inevitably, one door will not operate as smooth as the other four.
You'll need to do some cleaning up of the joints in order to make sure everything works as it should.
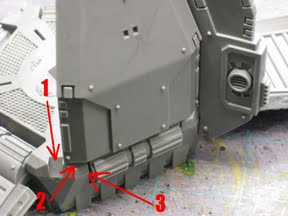
Using this picture as a guide, we're going to clean up a few connections to make sure everything operates without trouble.
All we're trying to do here is take the tip of our X-Acto blade or file
and clean away a bit of the surface area to increase the tolerances.
If you're using a file, you may need to back up and do this before
gluing everything in place as you won't be able to get in there once it
is glued.
1. This is actually for the fins to connect to in the next part. We just
want to make sure they can be slotted in here without having to squeeze
them in place.
2. The bottom of the door and the top of the floor deck. If this area is
snug, you won't be able to get your door closed all the way without
having to force it into position and we don't want to have to do that.
3. Make sure the sides of your doors are kept clean and free of glue and
debris. Any junk in here will also make moving the door troublesome.

In the end, we want our doors to all close up to this position. There
shouldn't be much of a gap between them when closed. Not much more than
the thickness of the stabilizing fin that goes between them.
Will you get them 100 percent perfect? No.
You shouldn't kill yourself trying to do it either. With a little work,
you should be able to get real close. You just have to keep in mind that
this is plastic we're working with and these things are not as perfect
as we'd like them to be sometimes. Just look at the old Land Speeders.
Once you are comfortable with how all your doors are operating, glue the
top portion of the floor deck to the base. This part is done. You can
also glue the engine vents to the underside at this time.
The engine and fin assembly
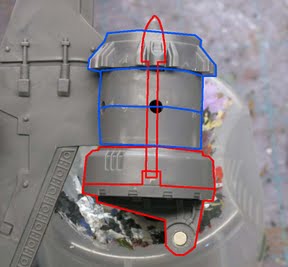
We
start with building the upper engine assembly. The stabilizing fin you
see in the picture is for reference only. It is not glued in place at
this point.
The red pieces are glued together and the blue pieces are glued
together. This will allow you to actually rotate the weapon mount when
done if you are careful in how much glue you use later on.
You can see the magnet in the middle of the weapon mount. I cut away the
stud, drilled out the hole and inserted a magnet into the opening.
Whatever magnet you use, make sure it is not any thicker than the width of the plastic for the mount.
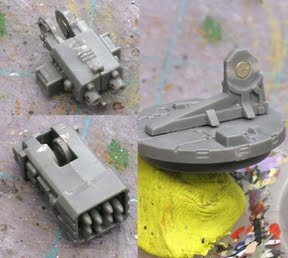
If you look closely, you can see that each weapon has a magnet inside it too.
Where it would connect to the mount by way of the pin, I have glued a magnet in place there.
Again, make sure you check your polarity. Once you glue the weapon
halves together, it may real tough to get them apart to fix it.
Doing it like this will allow you to use the parts that come with the
pod and still make the weapons interchangeable. It's just a matter of
sliding one off and sliding the new one in place.
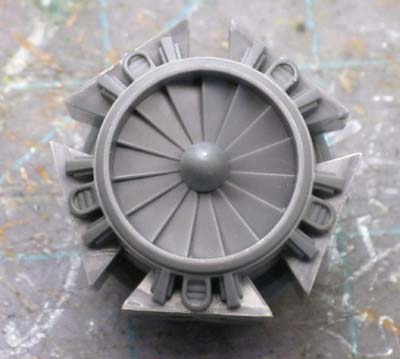
Next we glue on the five engine housing pieces to the upper engine. This
will allow us to position our fins on the engine correctly in the
following step.
This last part can be a bit tricky, but once you get two fins in place, the rest will be easy.

The first thing you do is set you inner harness assembly down on the
floor deck. It should sit in place without any trouble. DO NOT glue it
in place yet.
With the harness in place, take your upper engine assembly and add a
drop or two of glue in the slot created by two of the engine blocks you
just added to it.
With your upper engine assembly in one hand and a fin in the other, you
want to position the fin correctly on the floor deck (make sure it's
connected to the harness correctly too) and then glue it to the upper
engine housing.
Things should fit together snug enough that they will hold while the
glue dries. What we are trying to do is simply glue the fins to the
upper engine housing without gluing it to anything else just yet. This
allows us to lift the engine/fin assembly straight up when dry and
remove the harnesses as well.
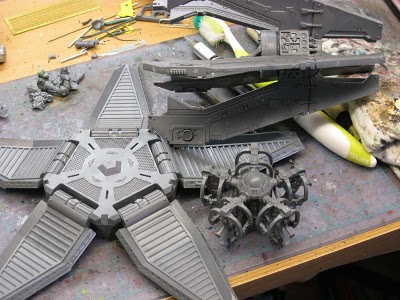
Before you take all the assemblies apart, make sure to place a dot on
the underside of each one so that you can line everything back up
together once you have it painted. In a perfect world, all of them would
be the same and you wouldn't have to worry, but we don't have that
luxury here.
We should have three distinct sub assemblies now that we can paint and
then reassemble afterwards. If this seems like a lot of work, it is.
But... I have three pieces now that I can paint up fairly quickly and
reassemble without any trouble creating a complete drop pod.
Follow-up Thoughts
And that ends Ron's post. As you'll see in the pictures below, I chose to put magnets on the other end of the pod doors when I put pods together. My thought was that you'd not only be able to keep the doors closed (which you can), but it would also allow you to stick things on the outside of the pod... such as tentacles, an exoskeleton, or whatever... in order to make them "infested" pods for use in a tyranid army. Given the trouble I had with opposing polarities on my version, however, I like Ron's solution a LOT better than my own. I MUST try this out the next time I set about putting pods together... Ron has come up with an elegant solution to a great looking model (that can be a challenge to put together well).
 1. Swapping out certain bits
 4. Your paint scheme


