Space Marine from THQ is almost here! See the countdown clock here: http://www.spacemarine.com/home
Also floating around the internet is news that he demo for the game will be released August 23. The PC version, downloadable on Steam, will be available August 18. From everything I've heard, this game is completely living up to the hype and the THQ experience of the license.
Way to go THQ! Now... let's go smash some ork faces!
Showing posts with label 40k. Show all posts
Showing posts with label 40k. Show all posts
Wednesday, August 17, 2011
Wednesday, August 03, 2011
Friday, July 15, 2011
Borrowed Hobby Tips: Making Your Army Standout
Once again stealing... er *borrowing* hobby tips from greater bloggers than myself, I am re-posting the blog post below from the fantastic "From the Warp" blog. This one, entitled, "5 Things to Make Your Army Standout" is a lot of simple but great advice. The original article can be found HERE. Please leave any comments on the original poster's blog as I don't deserve any credit for its manufacture.
--------
A long time ago (in the blogging world), I posted about making your army stand out. I had a few pics of some nice looking armies done by other gamers to show what I was talking about.
The question I was looking at was how we all go about making our armies stand out from the crowd and how we make them our own.
Since I'm building my new Deathwing (eventually), I find myself struggling with how to make them look different from the rest of the forces out there. And by different, I don't mean painting them orange or anything like that even though I'm sure that would work.
I find myself struggling with the tiniest of things like how I'm going to paint the chapter symbol on their right shoulder so that it looks like something more than just a red blob sitting there. How I'm going to paint the bases to show that these guys are on a specific planet and not just another "battlefield?"
So I got to thinking, what can we as gamers do to make our armies stand out and what are some of the more common solutions I've seen out there.
 1. Swapping out certain bits
This one is one of the easiest. Nothing more than a simple head swap or change of arms to give a model a different look. The big thing with this is that it doesn't require extensive greenstuff skills to pull off well. A well placed bit can change everything on a model.
2. Adding bits/trophies, etc.
Along the lines of the first one, this is more of adding things to models. Things like backpacks, gun scopes, swords or anything like that. This one has the benefit of tying all your guys together too to give them a unified look.
3. Conversion work
Once you start greenstuffing... it can be hard to stop. This is the next step after swapping out or adding on bits. You start making your own stuff or making things fit that wouldn't normally. This can be real simple like a pelt or real complex like a full length cloak on a model. The sky is the limit here.
 4. Your paint scheme
Whether you go with the Codex approved paint job or you make up your own, trying out a new color or method can make huge difference. Who cares if their guns are always red? Paint them blue or another color and see what it does to the look of the army. That might be all you need to rise above the rest of the crowd.
Maybe it's a simple detail line an icon or a line around the border of an element. It doesn't always have to be complex.
Maybe it's really nothing more than adding that one last layer of detail in terms of a final wash or line highlight or one last well defined shadow to your rank and file guys to finish them off.
5. Your basing
With the explosion of resin bases out there these days, it's become very easy to get a nice environmental feel to your force for just a little bit more work. Working with resin can seem daunting for some folks, but it's fairly easy actually.
And even if you don't go the resin route, simply completing the basing on your army improves the look ten fold I think. There's nothing wrong at all with a basic textured base that is painted well.
In the end, it shouldn't take much to get a good looking force that stands out from everything else out there. Nothing says you have to have a fully scratchbuilt army to look good. Just changing one little thing can be enough to make your guys really look sharp.
As for me, I'm thinking about adding tabards to my Terminators (all ten of them) to give them a different look. Of course then I have to figure out what color I'm going to paint them so that I don't look like everyone else out there.
Wednesday, July 06, 2011
THQ Still Loves GW
With the upcoming release of THQ's Space Marine, there is a bit of chatter as to whether or not Space Marine is just another Gears of War clone. As THIS REVIEW will tell you, that claim is utter nonsense! Below are a couple of screen shots that accompany the review:


Ok, so this wasn't much of a post, but I'm getting jazzed for the release of this game! September just can't come soon enough...
Ok, so this wasn't much of a post, but I'm getting jazzed for the release of this game! September just can't come soon enough...
Friday, July 01, 2011
DIY: 40k Conversions - Conversion Beamer
One really cool option that is seldom played on the 40k table by vanilla marine armies is the Master of the Forge. Most people don't like him because: (a) he doesn't have an invulnerable save, and (b) he is essentially a two-wound version of the techmarine, which can be purchased for much less, and without taking up an HQ slot. But there is one really awesome piece of equipment that is available to the Master that can not be purchased anywhere else... in the entire game: the conversion beamer. A conversion beamer is an odd little device that has a variable strength and ap value based upon the distance to your target... but the further away from your target you get, the better it works. And at a 72" max range, you're most effective when almost nothing else in the game can touch you. The odd thing about this little device? Nobody knows what it looks like! No model has been made for it since at least the Rogue Trader days, and that's the last time a picture was produced too. While this may cause some people frustration, I think it's a great opportunity for some conversion work.

(The RT conversion beamer in all its black and white glory.)


Interestingly, most likely because most current 40k players either didn't play the game back in RT, or much more disturbingly, simply weren't alive yet, there have been many attempts at capturing what the conversion beamer should look like:
From Stillfrosty at LINK:
Note in this version the conversion beamer uses a 'dish' to beam the deadly signal, but is essentially the size of a bolter.
From Digitaldaggers on the Bolter and Chainsword forums LINK:
This thing looks like it's mostly centered around a plasma cannon, but that thing is massive! Talk about the extreme opposite from the bolter version.
From Gurth on the Botler and Chainsword forums LINK:
 Take a good look at the guy in the middle. This is an amazing scratch version of the conversion beamer that has been given to some rogue trader era space marines... back when even a humble foot soldier could carry them into battle. I don't know if Gurth actually made this model or if he just found it on the web somewhere, but I do seem to recall that someone, somewhere, scratch built and then cast that thing for his own personal use...
From WeeMan LINK:
 This one is also based on some RT era parts, but relies on the old plasma cannon for its design. Note that in this model you will see a fairly popular trend to put the master on a bike. It makes sense that if you're going to want to fire that weapon at maximum range, then you need to be able to move fast enough to fire it that way! By putting him on a bike you don't have to tie up a transport, and that extra toughness boost doesn't hurt either... even though S8 weapons will still make him go splat.
From Stillfrosty LINK:
 I think this is a model that Stillfrosty found on the web when trying to figure out how he was going to do his own version, but I could be mistaken. Either way, note that this is another massive version of the beamer, and has even been loaded onto a sidecar like WeeMen's version. It's interesting to see that some people have decided a man portable relic should have the profile of a small tank...
From Turbo_MMX on the dakkadakka forums LINK:
 This is, by far, my favorite version of the beamer, and I used it as the basis for my own conversion. Note that as a plasma gun, it's still about the size of a bolter, but with the addition of the dish on front and the clever targeting module from the Ravenwing sprue, this thing becomes something just a little beefier than your typical hand weapon. Also like Turbo_MMX, I decided to put mine on a bike as well, to take full advantage of the need for mobility and the toughness boost, without having to use the larger sidecar footprint.
This conversion is deceptively simple, and you can pull it off without any step-by-step instructions, although there should be some within that dakka page I've cited above.
Although I do not have a picture of mine up here yet, I'll do so once I've thrown some paint on it. I prefer not to show my models in their ugly naked stages, but I think you'll find some fairly common similarities between my model and the one above. When I get around to painting my own Master of the Forge, I'll be sure to post him up here as an update... or as a page by himself with a link back to this page.
But what should we learn from all of these pictures? Sometimes not having everything spelled out by GW creates great opportunities for real creativity to flow in the creation of your conversions. At least, that's my take on it...
From Gurth on the Botler and Chainsword forums LINK:
From WeeMan LINK:
From Stillfrosty LINK:
From Turbo_MMX on the dakkadakka forums LINK:
This conversion is deceptively simple, and you can pull it off without any step-by-step instructions, although there should be some within that dakka page I've cited above.
Although I do not have a picture of mine up here yet, I'll do so once I've thrown some paint on it. I prefer not to show my models in their ugly naked stages, but I think you'll find some fairly common similarities between my model and the one above. When I get around to painting my own Master of the Forge, I'll be sure to post him up here as an update... or as a page by himself with a link back to this page.
But what should we learn from all of these pictures? Sometimes not having everything spelled out by GW creates great opportunities for real creativity to flow in the creation of your conversions. At least, that's my take on it...
Wednesday, June 22, 2011
Borrowed Hobby Tips: Hardening Card Stock
Ron over at From the Warp always some creative ideas for your hobby... far more than I do, anyway. In this installment of hobby tips that I've stolen from other people's blogs, you'll see how you can use the flexibility and easy to carve/cut capabilities of regular card stock (note cards, etc.) to create complex green stuff backing or other shapes that would be very difficult with plasticard (sheet styrene in the U.S.). I encourage you to visit and leave any comments you have on the original article that you can find HERE. Enjoy!

With all the sculpting that I do, I've developed a way to turn simple cardstock into plasticard and make a very sturdy base for me to sculpt on when I need it. Using plasticard and greenstuff is an art. Some folks do it better than others... I'm not one of those and that's how this trick came about.
I've been asked before how I do this particular thing and I figured it was time to show exactly what I do to make the change from cardstock to plasticard.
You'll need two things
 Cardstock and Superglue
When it comes to cardstock, I prefer the simple stuff like a regular index card. You can use posterboard if you want, you just need to make sure it's not the glossy kind or that it has any kind of coating to it. You want the stuff that will absorb liquid.
As for the superglue, I use the cheap stuff myself. The trick though is getting a kind that is like water. You want it to be very runny and nothing like a gel. You want to be able to apply it to the cardstock and have it be absorbed into it easily.
What I use this technique for
While I'm sure there are more uses, I tend to focus on just a couple of things. Purity seals (the long flowing kind), and support structures for when I sculpt things like tabards. Those are the two main things.
I also use this approach when I'm building armour plates like my Pre-Heresy Terminator shoulderpads and greaves.
How it works in practice
In the case of things like purity seals, I simply cut out the shape I want, bend it into position carefully and then attach the piece to the model with a tiny drop at the connection point. Once it's secured, I go through and "coat" the cardstock with superglue by adding a few drops here and there and allowing them to absorb into the cardstock.
When it comes to tabards, it's the same thing. Cut your cardstock to shape, attach it to the model and then coat with glue.


I usually only coat one side of the cardstock and thats the side I'll be applying the greenstuff or any paint to. The other side is left alone. It can still be worked on since the glue has soaked through the cardstock and solidified the whole thing.
What to be careful of
The big thing is applying too much superglue. This only matters on things like the purity seals since too much superglue will dry and once the cardstock has absorbed all it can, the rest will pool up on the surface creating unwanted texture.
In the case of half tabards, it doesn't matter since you'll be covering the whole thing with greenstuff anyway.
The second problem comes when you rush the drying. Don't mess with the superglue as it's drying or you run the risk of pushing it around on the surface and creating waves of texture. The idea is for all the glue to absorb and leave a smooth surface you can work over it without having to worry about the water in your paints affecting the cardstock underneath and eating away at the stability of your model.
And there you have it, how to take regular index card (cardstock) and turn it into "plasticard" so that you get the rigidity and support you need in the end while keeping the flexibility and ease of working with cardstock in the beginning.
Turning cardstock into plasticard
With all the sculpting that I do, I've developed a way to turn simple cardstock into plasticard and make a very sturdy base for me to sculpt on when I need it. Using plasticard and greenstuff is an art. Some folks do it better than others... I'm not one of those and that's how this trick came about.
I've been asked before how I do this particular thing and I figured it was time to show exactly what I do to make the change from cardstock to plasticard.
You'll need two things
When it comes to cardstock, I prefer the simple stuff like a regular index card. You can use posterboard if you want, you just need to make sure it's not the glossy kind or that it has any kind of coating to it. You want the stuff that will absorb liquid.
As for the superglue, I use the cheap stuff myself. The trick though is getting a kind that is like water. You want it to be very runny and nothing like a gel. You want to be able to apply it to the cardstock and have it be absorbed into it easily.
What I use this technique for
While I'm sure there are more uses, I tend to focus on just a couple of things. Purity seals (the long flowing kind), and support structures for when I sculpt things like tabards. Those are the two main things.
I also use this approach when I'm building armour plates like my Pre-Heresy Terminator shoulderpads and greaves.
How it works in practice
In the case of things like purity seals, I simply cut out the shape I want, bend it into position carefully and then attach the piece to the model with a tiny drop at the connection point. Once it's secured, I go through and "coat" the cardstock with superglue by adding a few drops here and there and allowing them to absorb into the cardstock.
When it comes to tabards, it's the same thing. Cut your cardstock to shape, attach it to the model and then coat with glue.
I usually only coat one side of the cardstock and thats the side I'll be applying the greenstuff or any paint to. The other side is left alone. It can still be worked on since the glue has soaked through the cardstock and solidified the whole thing.
What to be careful of
The big thing is applying too much superglue. This only matters on things like the purity seals since too much superglue will dry and once the cardstock has absorbed all it can, the rest will pool up on the surface creating unwanted texture.
In the case of half tabards, it doesn't matter since you'll be covering the whole thing with greenstuff anyway.
The second problem comes when you rush the drying. Don't mess with the superglue as it's drying or you run the risk of pushing it around on the surface and creating waves of texture. The idea is for all the glue to absorb and leave a smooth surface you can work over it without having to worry about the water in your paints affecting the cardstock underneath and eating away at the stability of your model.
And there you have it, how to take regular index card (cardstock) and turn it into "plasticard" so that you get the rigidity and support you need in the end while keeping the flexibility and ease of working with cardstock in the beginning.
Sunday, June 12, 2011
THQ Loves GW
For hardcore GW fans, who doesn't think this looks like a lot of fun? I'm in.
And yes, I realize this is old news... I pre-posted this thing a looooong time ago. Of course, one of the best parts of this little arcade game is that it will allegedly be available for download through the Playstation Network and Xbox Live this summer, and that completing it will allow users to utilize the "Power Sword" in the upcoming Space Marine game that is out in August. ...I'm totally going to have to figure out how to get my wife to let me buy this game. (I've already pre-ordered Space Marine...)
And yes, I realize this is old news... I pre-posted this thing a looooong time ago. Of course, one of the best parts of this little arcade game is that it will allegedly be available for download through the Playstation Network and Xbox Live this summer, and that completing it will allow users to utilize the "Power Sword" in the upcoming Space Marine game that is out in August. ...I'm totally going to have to figure out how to get my wife to let me buy this game. (I've already pre-ordered Space Marine...)
Friday, June 03, 2011
Borrowed Hobby Tips: Assembling a Drop Pod
Below is a fantastic article put together by Ron at his awesome From the Warp blog that I'm posting here in case you missed it at its original location. As usual, I am re-posting his work, without permission, but I strongly suggest that you visit his site for some other great articles; his stuff is consistently top-notch. I have added some of my own comments at the bottom with regard to my own approach. I just wish he'd put this up before I magnetized a couple of pods on my own...
 If you've never built one of these before, you owe to yourself to do some research before you get underway.
There are a few things you need to know before you put glue to plastic.
Magnetizing is an added benefit, not necessary, but definitely nice to do.
This tutorial covers the basic construction and magnetizing of the doors and both weapons for the drop pod. You can skip the magnetizing parts and still use all the info here to build your pod.
Believe me, reading this before you attempt to build your own will help you out tremendously. I wish I had it before I started mine. Make sure to read through the whole thing before attempting it though. While it's presented in the order you should do things, there is some room to move things around and depending on what tools you have available, you may need to do just that.
The follow up to this post will be the painting of the same pod. The construction of this is designed to allow easy painting of the final three sub-assemblies so that you can get into all the tight spaces fairly quickly and easily with the last step being to glue the three components together.
Start by cutting and cleaning everything
Start out by making sure you have all your pieces and your tools. If you're magnetizing this, you'll need a few more things in addition to your clippers, files and glue. I use 1/8 inch rare earth magnets for my work. I've got a 1/8 drill bit that I use to create the perfect size hole for the magnets to rest comfortably in. This project requires 13 magnets when all said and done.
I've found it easiest to clip everything from the sprue and take care of all my mold lines. Once I have everything ready, then I start building.
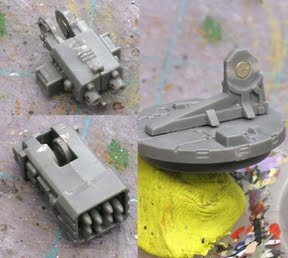
We're going to build three sub-assemblies. The inner harness assembly, the floor and doors and the engine/fin assembly.
The inner harness assembly
This is perhaps the most important thing of the whole project. Understanding this little tidbit matters. Unfortunately, GW is not that clear in their directions and most of us have figured this out by trial and error.
 The
center console itself can sit on the floor base facing any direction.
The key is getting the components of the Sergent's individual harness
correct.
The
center console itself can sit on the floor base facing any direction.
The key is getting the components of the Sergent's individual harness
correct.
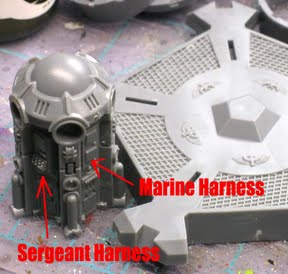
To do that, we need to know what components make up the Sergeant harness.
On the center console itself, it will be the one panel that has the keypad and readout screen and not just two blank spots. The blanks spots are all the Marine harness points.
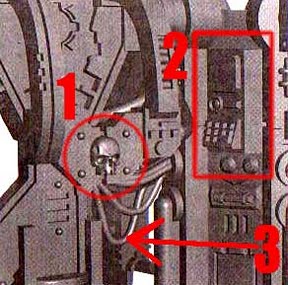 GW provides this tiny picture in the instructions but no real explanation as to why it's there.
There are three things you need to note about the drawing.
1. The Sergeant shoulder harness is the one with the skull. The rest have round blanks in the same position.
2. That particular harness/upright assembly needs to plug into that particular panel on the center console.
3. The Sergeant also has a specific upright piece as well and it can be determined by the low hanging cable that none of the other uprights have.
If you try and fit any other harness into the Sergeant upright, you'll notice that you'll have considerable trouble. This is because the pegs for his particular shoulder harness are made to fit into his particular upright piece. Get this correct and the rest is a piece of cake.
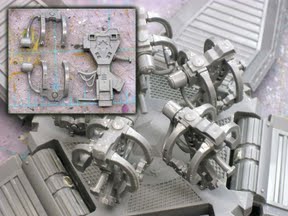 You can see each "harness" is actually two (one on each side) and an upright in the middle.
I built all of my harnesses and then attached them to the console making sure to put the Sergeant harness next to the correct panel on the console.
In the picture there, I have them resting on the floor piece, but they are NOT glued in place yet to the floor.
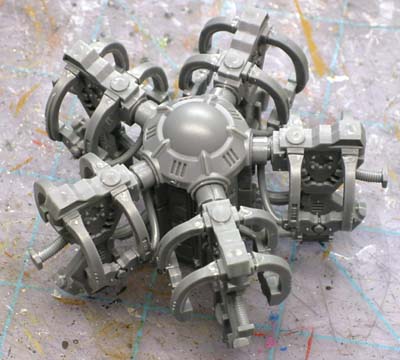
And the completed inner harness assembly. Each harness has been glued into the console. This part is done now. We can set it aside for later on.
The floor and doors
The majority of the work here is due to the fact that I magnetized the doors. Drop that option and you should be able to cruise through this portion with ease. The first thing is to build each door by gluing the halves together.
 I elected to magnetize the doors in such a way that the magnet is not obvious and positioned at the tip of the door when opened.
I wanted to keep the doors upright, but did not want them to close so tightly that it would be difficult to get the open either.
The drawback to this method is that the magnets are positioned in such a way that if they do break, it will be almost impossible to repair.
They should not need to be repaired I believe with normal use, but it's worth noting and being aware of it if that is a big concern when building your own pod.
We start by gluing a small piece of sprue (narrow end upright) just a millimeter or two from the edge of each door opening. Mark the middle of it along with the middle of your door. It's best to place the door in the frame to see how it all lines up.
The magnet will go in the door itself just above the seam between the two halves as seen in the picture. The line up between both magnets does not need to be perfect, but you want to get it as close as possible.
Also make sure that your magnets are flush with the surface they are embedded in. There is not a lot of wiggle room here and it pays to get as close as possible.
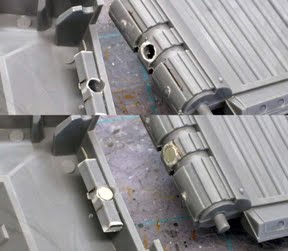 Drill your hole in each piece and secure your magnet to each half.
I don't think I need to remind everyone about magnet polarity. If you get it wrong, you'll need some creative cutting to extract the snugly glued in place magnet.
Once you have all the doors done this way, you can test them out to see how they work.
There should be just enough draw between the magnets that the door will "pop" into the upright position when it gets close, but not so much that it can't easily be pulled away.
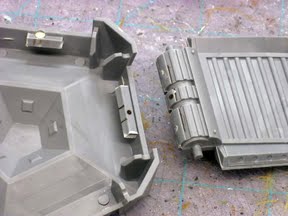
 Here you can see how the finished door will look. The magnet is barely visible in the open position.
When closed, you can see how the two magnets line up (this is prior to the floor being glued in place).
You'll want to make sure all of your doors are functioning correctly prior to gluing the floor decking in place. Once it's down, you can't make any more adjustments.
Inevitably, one door will not operate as smooth as the other four.
You'll need to do some cleaning up of the joints in order to make sure everything works as it should.
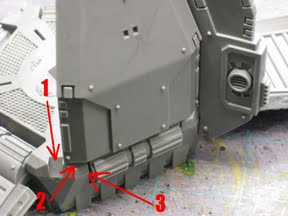 Using this picture as a guide, we're going to clean up a few connections to make sure everything operates without trouble.
All we're trying to do here is take the tip of our X-Acto blade or file and clean away a bit of the surface area to increase the tolerances.
If you're using a file, you may need to back up and do this before gluing everything in place as you won't be able to get in there once it is glued.
1. This is actually for the fins to connect to in the next part. We just want to make sure they can be slotted in here without having to squeeze them in place.
2. The bottom of the door and the top of the floor deck. If this area is snug, you won't be able to get your door closed all the way without having to force it into position and we don't want to have to do that.
3. Make sure the sides of your doors are kept clean and free of glue and debris. Any junk in here will also make moving the door troublesome.

In the end, we want our doors to all close up to this position. There shouldn't be much of a gap between them when closed. Not much more than the thickness of the stabilizing fin that goes between them.
Will you get them 100 percent perfect? No.
You shouldn't kill yourself trying to do it either. With a little work, you should be able to get real close. You just have to keep in mind that this is plastic we're working with and these things are not as perfect as we'd like them to be sometimes. Just look at the old Land Speeders.
Once you are comfortable with how all your doors are operating, glue the top portion of the floor deck to the base. This part is done. You can also glue the engine vents to the underside at this time.
The engine and fin assembly
 We
start with building the upper engine assembly. The stabilizing fin you
see in the picture is for reference only. It is not glued in place at
this point.
We
start with building the upper engine assembly. The stabilizing fin you
see in the picture is for reference only. It is not glued in place at
this point.
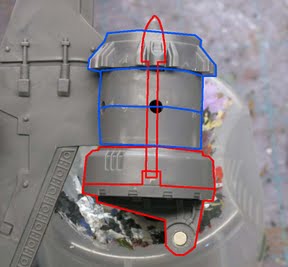
The red pieces are glued together and the blue pieces are glued together. This will allow you to actually rotate the weapon mount when done if you are careful in how much glue you use later on.
You can see the magnet in the middle of the weapon mount. I cut away the stud, drilled out the hole and inserted a magnet into the opening.
Whatever magnet you use, make sure it is not any thicker than the width of the plastic for the mount.
 If you look closely, you can see that each weapon has a magnet inside it too.
Where it would connect to the mount by way of the pin, I have glued a magnet in place there.
Again, make sure you check your polarity. Once you glue the weapon halves together, it may real tough to get them apart to fix it.
Doing it like this will allow you to use the parts that come with the pod and still make the weapons interchangeable. It's just a matter of sliding one off and sliding the new one in place.
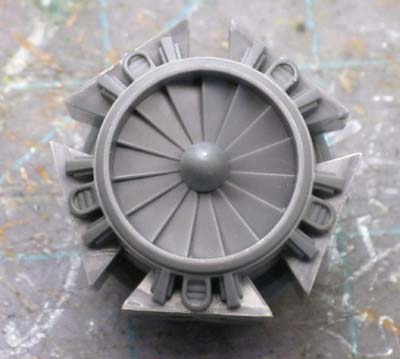
Next we glue on the five engine housing pieces to the upper engine. This will allow us to position our fins on the engine correctly in the following step.
This last part can be a bit tricky, but once you get two fins in place, the rest will be easy.

The first thing you do is set you inner harness assembly down on the floor deck. It should sit in place without any trouble. DO NOT glue it in place yet.
With the harness in place, take your upper engine assembly and add a drop or two of glue in the slot created by two of the engine blocks you just added to it.
With your upper engine assembly in one hand and a fin in the other, you want to position the fin correctly on the floor deck (make sure it's connected to the harness correctly too) and then glue it to the upper engine housing.
Things should fit together snug enough that they will hold while the glue dries. What we are trying to do is simply glue the fins to the upper engine housing without gluing it to anything else just yet. This allows us to lift the engine/fin assembly straight up when dry and remove the harnesses as well.
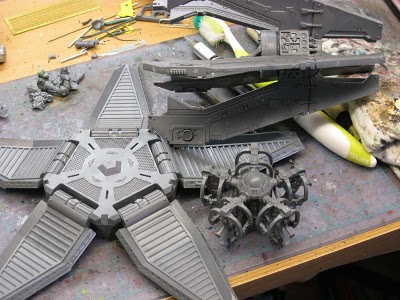
Before you take all the assemblies apart, make sure to place a dot on the underside of each one so that you can line everything back up together once you have it painted. In a perfect world, all of them would be the same and you wouldn't have to worry, but we don't have that luxury here.
We should have three distinct sub assemblies now that we can paint and then reassemble afterwards. If this seems like a lot of work, it is. But... I have three pieces now that I can paint up fairly quickly and reassemble without any trouble creating a complete drop pod.

The definitive guide to building and magnetizing a Space Marine Drop pod
If you've never built one of these before, you owe to yourself to do some research before you get underway.There are a few things you need to know before you put glue to plastic.
Magnetizing is an added benefit, not necessary, but definitely nice to do.
This tutorial covers the basic construction and magnetizing of the doors and both weapons for the drop pod. You can skip the magnetizing parts and still use all the info here to build your pod.
Believe me, reading this before you attempt to build your own will help you out tremendously. I wish I had it before I started mine. Make sure to read through the whole thing before attempting it though. While it's presented in the order you should do things, there is some room to move things around and depending on what tools you have available, you may need to do just that.
The follow up to this post will be the painting of the same pod. The construction of this is designed to allow easy painting of the final three sub-assemblies so that you can get into all the tight spaces fairly quickly and easily with the last step being to glue the three components together.
Start by cutting and cleaning everything
Start out by making sure you have all your pieces and your tools. If you're magnetizing this, you'll need a few more things in addition to your clippers, files and glue. I use 1/8 inch rare earth magnets for my work. I've got a 1/8 drill bit that I use to create the perfect size hole for the magnets to rest comfortably in. This project requires 13 magnets when all said and done.
I've found it easiest to clip everything from the sprue and take care of all my mold lines. Once I have everything ready, then I start building.
We're going to build three sub-assemblies. The inner harness assembly, the floor and doors and the engine/fin assembly.
The inner harness assembly
This is perhaps the most important thing of the whole project. Understanding this little tidbit matters. Unfortunately, GW is not that clear in their directions and most of us have figured this out by trial and error.
The
center console itself can sit on the floor base facing any direction.
The key is getting the components of the Sergent's individual harness
correct. To do that, we need to know what components make up the Sergeant harness.
On the center console itself, it will be the one panel that has the keypad and readout screen and not just two blank spots. The blanks spots are all the Marine harness points.
GW provides this tiny picture in the instructions but no real explanation as to why it's there.There are three things you need to note about the drawing.
1. The Sergeant shoulder harness is the one with the skull. The rest have round blanks in the same position.
2. That particular harness/upright assembly needs to plug into that particular panel on the center console.
3. The Sergeant also has a specific upright piece as well and it can be determined by the low hanging cable that none of the other uprights have.
If you try and fit any other harness into the Sergeant upright, you'll notice that you'll have considerable trouble. This is because the pegs for his particular shoulder harness are made to fit into his particular upright piece. Get this correct and the rest is a piece of cake.
You can see each "harness" is actually two (one on each side) and an upright in the middle.I built all of my harnesses and then attached them to the console making sure to put the Sergeant harness next to the correct panel on the console.
In the picture there, I have them resting on the floor piece, but they are NOT glued in place yet to the floor.
And the completed inner harness assembly. Each harness has been glued into the console. This part is done now. We can set it aside for later on.
The floor and doors
The majority of the work here is due to the fact that I magnetized the doors. Drop that option and you should be able to cruise through this portion with ease. The first thing is to build each door by gluing the halves together.
I elected to magnetize the doors in such a way that the magnet is not obvious and positioned at the tip of the door when opened.I wanted to keep the doors upright, but did not want them to close so tightly that it would be difficult to get the open either.
The drawback to this method is that the magnets are positioned in such a way that if they do break, it will be almost impossible to repair.
They should not need to be repaired I believe with normal use, but it's worth noting and being aware of it if that is a big concern when building your own pod.
We start by gluing a small piece of sprue (narrow end upright) just a millimeter or two from the edge of each door opening. Mark the middle of it along with the middle of your door. It's best to place the door in the frame to see how it all lines up.
The magnet will go in the door itself just above the seam between the two halves as seen in the picture. The line up between both magnets does not need to be perfect, but you want to get it as close as possible.
Also make sure that your magnets are flush with the surface they are embedded in. There is not a lot of wiggle room here and it pays to get as close as possible.
Drill your hole in each piece and secure your magnet to each half.I don't think I need to remind everyone about magnet polarity. If you get it wrong, you'll need some creative cutting to extract the snugly glued in place magnet.
Once you have all the doors done this way, you can test them out to see how they work.
There should be just enough draw between the magnets that the door will "pop" into the upright position when it gets close, but not so much that it can't easily be pulled away.
Here you can see how the finished door will look. The magnet is barely visible in the open position.When closed, you can see how the two magnets line up (this is prior to the floor being glued in place).
You'll want to make sure all of your doors are functioning correctly prior to gluing the floor decking in place. Once it's down, you can't make any more adjustments.
Inevitably, one door will not operate as smooth as the other four.
You'll need to do some cleaning up of the joints in order to make sure everything works as it should.
Using this picture as a guide, we're going to clean up a few connections to make sure everything operates without trouble.All we're trying to do here is take the tip of our X-Acto blade or file and clean away a bit of the surface area to increase the tolerances.
If you're using a file, you may need to back up and do this before gluing everything in place as you won't be able to get in there once it is glued.
1. This is actually for the fins to connect to in the next part. We just want to make sure they can be slotted in here without having to squeeze them in place.
2. The bottom of the door and the top of the floor deck. If this area is snug, you won't be able to get your door closed all the way without having to force it into position and we don't want to have to do that.
3. Make sure the sides of your doors are kept clean and free of glue and debris. Any junk in here will also make moving the door troublesome.
In the end, we want our doors to all close up to this position. There shouldn't be much of a gap between them when closed. Not much more than the thickness of the stabilizing fin that goes between them.
Will you get them 100 percent perfect? No.
You shouldn't kill yourself trying to do it either. With a little work, you should be able to get real close. You just have to keep in mind that this is plastic we're working with and these things are not as perfect as we'd like them to be sometimes. Just look at the old Land Speeders.
Once you are comfortable with how all your doors are operating, glue the top portion of the floor deck to the base. This part is done. You can also glue the engine vents to the underside at this time.
The engine and fin assembly
We
start with building the upper engine assembly. The stabilizing fin you
see in the picture is for reference only. It is not glued in place at
this point.The red pieces are glued together and the blue pieces are glued together. This will allow you to actually rotate the weapon mount when done if you are careful in how much glue you use later on.
You can see the magnet in the middle of the weapon mount. I cut away the stud, drilled out the hole and inserted a magnet into the opening.
Whatever magnet you use, make sure it is not any thicker than the width of the plastic for the mount.
If you look closely, you can see that each weapon has a magnet inside it too.Where it would connect to the mount by way of the pin, I have glued a magnet in place there.
Again, make sure you check your polarity. Once you glue the weapon halves together, it may real tough to get them apart to fix it.
Doing it like this will allow you to use the parts that come with the pod and still make the weapons interchangeable. It's just a matter of sliding one off and sliding the new one in place.
Next we glue on the five engine housing pieces to the upper engine. This will allow us to position our fins on the engine correctly in the following step.
This last part can be a bit tricky, but once you get two fins in place, the rest will be easy.
The first thing you do is set you inner harness assembly down on the floor deck. It should sit in place without any trouble. DO NOT glue it in place yet.
With the harness in place, take your upper engine assembly and add a drop or two of glue in the slot created by two of the engine blocks you just added to it.
With your upper engine assembly in one hand and a fin in the other, you want to position the fin correctly on the floor deck (make sure it's connected to the harness correctly too) and then glue it to the upper engine housing.
Things should fit together snug enough that they will hold while the glue dries. What we are trying to do is simply glue the fins to the upper engine housing without gluing it to anything else just yet. This allows us to lift the engine/fin assembly straight up when dry and remove the harnesses as well.
Before you take all the assemblies apart, make sure to place a dot on the underside of each one so that you can line everything back up together once you have it painted. In a perfect world, all of them would be the same and you wouldn't have to worry, but we don't have that luxury here.
We should have three distinct sub assemblies now that we can paint and then reassemble afterwards. If this seems like a lot of work, it is. But... I have three pieces now that I can paint up fairly quickly and reassemble without any trouble creating a complete drop pod.
Follow-up Thoughts
And that ends Ron's post. As you'll see in the pictures below, I chose to put magnets on the other end of the pod doors when I put pods together. My thought was that you'd not only be able to keep the doors closed (which you can), but it would also allow you to stick things on the outside of the pod... such as tentacles, an exoskeleton, or whatever... in order to make them "infested" pods for use in a tyranid army. Given the trouble I had with opposing polarities on my version, however, I like Ron's solution a LOT better than my own. I MUST try this out the next time I set about putting pods together... Ron has come up with an elegant solution to a great looking model (that can be a challenge to put together well).Wednesday, May 25, 2011
40k: Dirty Tricks (No. 14) - Deepstrike by the Numbers
5th edition 40k made deep striking a LOT safer and more productive than earlier editions. That having been said, however, it is still a scary proposition for most. Unless there is a locator beacon (or similar functioning device) on the table, many commanders simply won't drop their troops onto the table. The reality of the matter, however, is that deep striking is really not as dangerous as people think it is. Take a look at the picture below:
 If you click on the picture, you'll see that in this drop pod example (ignoring the guidance system for the moment), you're going to land right on target 33% of the time. When deploying, you're guys will end up right inside that little green circle with no worries. 50% of the time, you'll land within the yellow circle, which is just about the size of the pod. And 70% of the time you'll land within the red circle. Only 30% of the time will you land anywhere in the purple zone. You have a slightly better chance to land right on target!
And the same thing is also true for personnel:
 Here you've got a vanguard squad that has dropped onto the table. 33% of the time they'll also land on target... 50% of the time they'll land within 5" of their target... 70% of the time within 7" of their target. For something like vanguard, who can actually charge after they land due to heroic intervention, you've got a damn good chance of landing within range to pull off that charge.
So, what does this mean in practical application? Look at it this way... If you place this same squad just 5" away from your target squad, look at the possible scatter locations below.

Out of all of the possible landing locations, the green areas are spaces where your charge may fail, but your squad will still be safe from mishap. If the squad lands anywhere in the red area, this means your squad will still be within range to charge the target squad... even if it scatters within that scary 30% range of 7-12" of scatter. And there is only a tiny area of the possible scatter locations, almost all of which lies outside the 50% scatter distance range, which will actually cause a mishap.
And this is with a regular squad's deep striking ability. If this was a Blood Angels squad, your full scatter distance would actually be inside the red circle by 1" -- which would allow you to attempt to land even closer to the target squad with less probability of scattering into a dangerous area.
Regardless, I hope the pictures above give a clearer example of just how safe deep striking really is. The vast majority of the time, you'll probably have a safe landing... provided you pay attention to what else may lie within that circle of scatter, of course.
And the same thing is also true for personnel:
So, what does this mean in practical application? Look at it this way... If you place this same squad just 5" away from your target squad, look at the possible scatter locations below.
Out of all of the possible landing locations, the green areas are spaces where your charge may fail, but your squad will still be safe from mishap. If the squad lands anywhere in the red area, this means your squad will still be within range to charge the target squad... even if it scatters within that scary 30% range of 7-12" of scatter. And there is only a tiny area of the possible scatter locations, almost all of which lies outside the 50% scatter distance range, which will actually cause a mishap.
And this is with a regular squad's deep striking ability. If this was a Blood Angels squad, your full scatter distance would actually be inside the red circle by 1" -- which would allow you to attempt to land even closer to the target squad with less probability of scattering into a dangerous area.
Regardless, I hope the pictures above give a clearer example of just how safe deep striking really is. The vast majority of the time, you'll probably have a safe landing... provided you pay attention to what else may lie within that circle of scatter, of course.
Friday, April 22, 2011
Borrowed Hobby Tips: Weathering
I'm not painting genius by any stretch of the imagination, but I sure can recognize painting genius when other people do it! Further, why bother going through the process of explaining to you what other folks have already done MUCH better than I could have? Am I right?
With that in mind, I present to you two articles on weathering by Aaron "Grey_Death" P. over at The Painting Corps. Aaron does some fantastic work, and most of his techniques are incredibly simple to implement (his Medusa army in particular is just stunning...). At the moment I'm attempting to apply some of the techniques below to some scenery projects I have on my own hobby table. Once that's perfected... maybe I'll give this a shot on my models as well!
Weathering Armor: Link to Article
Deceptively simple, yet amazing results. A "must see" tutorial.


Weathering Marines: Link to Article
Like the armor article, this uses a very simple sponge technique that anyone can do.

As you can see, Aaron is pretty talented, and he's willing to share his talent with all of us. We should take him up on the offer. Visit his site regularly and catch his regular weekly tips... you won't be disappointed.
With that in mind, I present to you two articles on weathering by Aaron "Grey_Death" P. over at The Painting Corps. Aaron does some fantastic work, and most of his techniques are incredibly simple to implement (his Medusa army in particular is just stunning...). At the moment I'm attempting to apply some of the techniques below to some scenery projects I have on my own hobby table. Once that's perfected... maybe I'll give this a shot on my models as well!
Weathering Armor: Link to Article
Deceptively simple, yet amazing results. A "must see" tutorial.
Weathering Marines: Link to Article
Like the armor article, this uses a very simple sponge technique that anyone can do.
As you can see, Aaron is pretty talented, and he's willing to share his talent with all of us. We should take him up on the offer. Visit his site regularly and catch his regular weekly tips... you won't be disappointed.
Wednesday, March 30, 2011
40k: Dirty Tricks (No. 13) - Keeping Your Eye on the Prize
Ok, so this doesn't really qualify as a "dirty trick," per se, and it probably won't work out to be much of a tactics article, but I do get to use at least one funny picture that I've been itching to use, so that's GOT to count for something, right?
The point of this article is really an opportunity to admonish those of you that manage to let a game that is 'in the bag' slip through your fingers by getting too greedy, or by forgetting the point of the game. A clever opponent, who realizes that he's lost the game, may trick you into handing him a draw if you're not careful. One such way your opponent may try to con you out of a win is through a simple bait and switch.
Take a good look at the picture below. This is one of those situations where you really have to be careful as to your next move. It's the top of turn 5, and you've got two objectives in the bag. Your opponent only has two tiny little units to harass you, and he's only got a single objective of his own... but there is a very real threat that you really can't ignore. It's your turn. If this game ends after your opponent's turn, your next move is critical!

What you see here is a classic 'bait & switch' maneuver that is about to be dropped on your head. Your opponent has intentionally tipped a hand in your direction where it appears as though he is going to assault your #2 objective next turn with the unit out in the open -- all he has to do is whether the storm of gunfire that is bound to come his way, and then he can hit you with whatever is left over. If he lives through the fusillade of fire, he assaults you, pulls you off the objective, and swoops in with the unit in cover behind you to contest (or even take!) the objective. Even if he can't weather the firestorm, what are the chances that you're going to take him out with just one of your unit's weapons? If you have to use both squads, he's still free to move the unit in cover right on top of the objective for a tied game. Right?
So, you weigh your options:
(1) Try to shoot both units. The unit in cover is more survivable, which means you have to fire more weapons at it in order to break or destroy it. Mathematically this means you have to use your smaller amount of guns on the unit outside of cover... but even if you have a solid BS4, only half those shots will hit, and then how many will actually wound? How many of those will be negated by armor saves? This is a bigger long shot than it looks. Even with 12 guys on the table, and even if half of them have heavy weapons, it's going to be tough to take out six opponents where half of them are in cover. Shooting just isn't as bad-ass as it used to be, and the numbers almost never work out the way you want. And on the off chance that you don't wipe out the squad in the open, there is a chance that he will not only survive to assault you, but may even charge in such a way to pull your squad off the objective completely! A potential loss is staring you right in the face here...
(2) Assault and fall back. A more certain way to make sure you only have a single squad to contend with in your opponent's turn is to use the squad on objective #2 to move towards the squad in the open, shoot him with your pistols and assault weapons (assuming you have them), and then charge him. After your shooting phase, and assuming you're not challenging a squad of terminators with storm shields, you should be able to wipe that squad out (even guardsmen vs. space marines) and then use your consolidation move to make sure you're back in cover for your opponent's shooting phase. This frees up your other squad to direct all of its fire at the enemy squatting in the bushes -- hopefully knocking it out or making it run. While this creates a better chance to have only one squad to face in the open during your opponent's turn, it's still risky. Your odds are still bad that you'll wipe out the cowering squad, and there is an additional concern that by assaulting, you may not kill the other guy, and be trapped away from the objective, or else not have enough distance to consolidate back onto the objective (and thus be hung out to dry for the opponent's shooting phase) -- thus creating an easy path for a win for the other guy.
But these are the choices you make when you don't keep your eyes on the objective. What is the point of the battle above? To hold more objectives than the other guy. How do you keep the objective out of your opponent's hands? By making it impossible for the other guy to reach the objective. You have a third option here:
(3) Circle the wagons. Your opponent can move towards the objective during his movement phase, during the shooting phase (by running), and in the assault phase (and any follow-up if he wins). You can deny him the ability to move towards the objective in the first two possible ways by simply making it impossible for him to get within 3" of the objective. If you circle your squad so that you're just over 2" away from the objective, and leave less than a base size in between your own men, then it is impossible for the opponent to get within 3" of the objective! You can still move, rapid fire the squad in the open (and thus give yourself the best odds in the ensuing assault), and just stay put. The odds that the enemy will pierce the bubble are really, really slim, thus nearly guaranteeing you maintain your victory. (Well, so long as he doesn't manage to lay down enough dakka to make you run... of course.)
That's not to say that all bets are out the window if you go to turn 6, but if you end at turn 5, you're more likely to win the game because you kept your eye on the ball.
And here's something else you may not have seen coming... The distance between objectives #1 and #2 is 12". With a 3" bubble created by each objective, you do understand that all your opponent has to do in order to WIN is to jump in between those two points and cover a little over 6" of ground. Each of those three man units is capable of spanning 7" of ground (1" for each base, and 2" in between each man in the unit). That means that either unit can jump in between your objectives and WIN the game by contesting both at the same time. He doesn't have to assault you at all! This should create an even greater emphasis on the idea that you have to protect that 3" bubble at all costs. If you're not at the fringes, then your eye is not on the ball... and you could lose!
Make that bubble a habit, and your opponent may not even realize you've kept him out of range... which means he might leave himself out in the open for no good reason if you're lucky. The less you look like you're keeping your eye on the prize, the more likely the opponent will not see what kind of tricks that YOU have up your sleeve. Focus on the objective... but don't let other guy know your focusing:

The point of this article is really an opportunity to admonish those of you that manage to let a game that is 'in the bag' slip through your fingers by getting too greedy, or by forgetting the point of the game. A clever opponent, who realizes that he's lost the game, may trick you into handing him a draw if you're not careful. One such way your opponent may try to con you out of a win is through a simple bait and switch.
BAIT AND SWITCH
Take a good look at the picture below. This is one of those situations where you really have to be careful as to your next move. It's the top of turn 5, and you've got two objectives in the bag. Your opponent only has two tiny little units to harass you, and he's only got a single objective of his own... but there is a very real threat that you really can't ignore. It's your turn. If this game ends after your opponent's turn, your next move is critical!
What you see here is a classic 'bait & switch' maneuver that is about to be dropped on your head. Your opponent has intentionally tipped a hand in your direction where it appears as though he is going to assault your #2 objective next turn with the unit out in the open -- all he has to do is whether the storm of gunfire that is bound to come his way, and then he can hit you with whatever is left over. If he lives through the fusillade of fire, he assaults you, pulls you off the objective, and swoops in with the unit in cover behind you to contest (or even take!) the objective. Even if he can't weather the firestorm, what are the chances that you're going to take him out with just one of your unit's weapons? If you have to use both squads, he's still free to move the unit in cover right on top of the objective for a tied game. Right?
So, you weigh your options:
(1) Try to shoot both units. The unit in cover is more survivable, which means you have to fire more weapons at it in order to break or destroy it. Mathematically this means you have to use your smaller amount of guns on the unit outside of cover... but even if you have a solid BS4, only half those shots will hit, and then how many will actually wound? How many of those will be negated by armor saves? This is a bigger long shot than it looks. Even with 12 guys on the table, and even if half of them have heavy weapons, it's going to be tough to take out six opponents where half of them are in cover. Shooting just isn't as bad-ass as it used to be, and the numbers almost never work out the way you want. And on the off chance that you don't wipe out the squad in the open, there is a chance that he will not only survive to assault you, but may even charge in such a way to pull your squad off the objective completely! A potential loss is staring you right in the face here...
(2) Assault and fall back. A more certain way to make sure you only have a single squad to contend with in your opponent's turn is to use the squad on objective #2 to move towards the squad in the open, shoot him with your pistols and assault weapons (assuming you have them), and then charge him. After your shooting phase, and assuming you're not challenging a squad of terminators with storm shields, you should be able to wipe that squad out (even guardsmen vs. space marines) and then use your consolidation move to make sure you're back in cover for your opponent's shooting phase. This frees up your other squad to direct all of its fire at the enemy squatting in the bushes -- hopefully knocking it out or making it run. While this creates a better chance to have only one squad to face in the open during your opponent's turn, it's still risky. Your odds are still bad that you'll wipe out the cowering squad, and there is an additional concern that by assaulting, you may not kill the other guy, and be trapped away from the objective, or else not have enough distance to consolidate back onto the objective (and thus be hung out to dry for the opponent's shooting phase) -- thus creating an easy path for a win for the other guy.
But these are the choices you make when you don't keep your eyes on the objective. What is the point of the battle above? To hold more objectives than the other guy. How do you keep the objective out of your opponent's hands? By making it impossible for the other guy to reach the objective. You have a third option here:
(3) Circle the wagons. Your opponent can move towards the objective during his movement phase, during the shooting phase (by running), and in the assault phase (and any follow-up if he wins). You can deny him the ability to move towards the objective in the first two possible ways by simply making it impossible for him to get within 3" of the objective. If you circle your squad so that you're just over 2" away from the objective, and leave less than a base size in between your own men, then it is impossible for the opponent to get within 3" of the objective! You can still move, rapid fire the squad in the open (and thus give yourself the best odds in the ensuing assault), and just stay put. The odds that the enemy will pierce the bubble are really, really slim, thus nearly guaranteeing you maintain your victory. (Well, so long as he doesn't manage to lay down enough dakka to make you run... of course.)
That's not to say that all bets are out the window if you go to turn 6, but if you end at turn 5, you're more likely to win the game because you kept your eye on the ball.
And here's something else you may not have seen coming... The distance between objectives #1 and #2 is 12". With a 3" bubble created by each objective, you do understand that all your opponent has to do in order to WIN is to jump in between those two points and cover a little over 6" of ground. Each of those three man units is capable of spanning 7" of ground (1" for each base, and 2" in between each man in the unit). That means that either unit can jump in between your objectives and WIN the game by contesting both at the same time. He doesn't have to assault you at all! This should create an even greater emphasis on the idea that you have to protect that 3" bubble at all costs. If you're not at the fringes, then your eye is not on the ball... and you could lose!
Make that bubble a habit, and your opponent may not even realize you've kept him out of range... which means he might leave himself out in the open for no good reason if you're lucky. The less you look like you're keeping your eye on the prize, the more likely the opponent will not see what kind of tricks that YOU have up your sleeve. Focus on the objective... but don't let other guy know your focusing:
Friday, March 11, 2011
40k: Dirty Tricks (No. 12) - Slicing the Pie


While Spacecurves definitely highlights an important tactic in his article, as usual, he is really tapping into two different tactical concepts here. The first, and most obvious, is positioning your flamer models so that they can do maximum damage when it comes time to unleash a flood of burning promethium. When you're moving your models forward, you don't leave your flamer out on the end of the squad, tucked behind one of your own troopers so that you can't hit more than a single member of the target unit. That would be foolish!

Any commander worth his salt is going to pay very close attention to where that flamer is located as he moves his miniatures forward. You're going to move them so that you have the best possible shot at all times. Sometimes it is hitting as many of the enemy squad as possible.

And sometimes its hitting the softer unit behind the squad you're actually shooting at with the rest of your squad. Your goal will depend on your situation on the battlefield, obviously.

The other tactical element that Spacecurves taps into is the concept of 'slicing the pie,' most commonly referred to as an element of dynamic entry.


If you're a military junky, like a lot of 40k players, the concept is probably not completely foreign to you. The idea is that you don't just walk into a room potentially full of hostiles. You carefully dissect the room by presenting as little of yourself as possible as you enter, increasing your angle of exposure slowly as you view what is in the room.

In 40k, if half or more of your squad is in cover, then everyone gets a cover save. Thus, like the picture below, the enemy can typically only see as much of you as you present to him (higher ground, weapon placement on vehicles, etc. all have an influence here).

Let's pretend for a moment that those four blue guys above are not just shadow elements in the diagram, but actual members of your four man squad. This schematic is showing you FAR more than you think it does.
First, if you look at the top blue guy, he obviously can't see the guy in red. But when you look at his line of sight, realize that in addition to himself, everyone in that squad can see everything in his line of vision. If you're looking to maximize your squads firing potential such that as many guns as possible can contribute to the squad's firepower, then you need to shoot at something in that top guy's field of vision. I realize this seems like a no brainer, but how many times have you seen a juicy target that is obviously open to some of your guys, and then declared it before you actually counted up the number of guns you'd be able to bring to bear? That happens a LOT, which is why it is important for you to not simply start looking for juicy targets, but to look at your squad's field of vision first, and then identify the best target in their line of sight.Second, this field of vision diagram also shows you whether or not the guy in red gets a cover save. Let's say the guy at the bottom of the blue stack has an AP1 weapon that will blow a hole clean through Mr. Red if it hits him. And let's say that that grey line is no longer a wall, but a hedge that all of your guys can see over. Now, this picture is a close call, but let's pretend that you and your opponent can agree that the guy at the bottom of the stack has a clear unobstructed view to Mr. Red. If that's true, then all of a sudden, you have to decide if you want to go the route of 'fusillade of fire,' or if you want to take a chance with blowing a hole in Mr. Red that he can't save. If you opt to only shoot with the guy at the bottom, then Mr. Red will not get a cover save -- the only shot made is unimpeded. Think backwards: if the majority of the shots fired are made at models in cover from them, then the target gets a cover save; if the majority of the shots fired are made at models that do not have cover from them, then the target does not get a cover save. Just as if you were firing from a rooftop where only your heavy weapon had the range to make the shot, it doesn't matter if the rest of the squad, had it been in range and fired, would have done so from a position that would have given Mr. Red a cover save -- if only the heavy weapon fires, then he doesn't get one. The same concept applies here.
Third, in addition to determining whether he's going to get a cover save from you, it is also telling you who is going to be in cover from Mr. Red when he fires back! The cover rules in 40k are really weird in that they can be manipulated in such a fashion where you can leave a special/heavy weapon hanging out in no man's land with no cover, and yet somehow still get a cover save because everyone else in the squad is cowering behind a rock. If you want to avoid your enemy's weapons that need a line of sight to shoot at you, then you can slice the pie with intervening models and terrain to make sure that the enemy doesn't have a bead on you. Similarly, you can slice the pie in such a way that you can minimize potential damage to your squad by making sure that your squad will have a majority of its members in cover to make best use of the abstract cover rules.
Whether or not you're conscious of it, you're slicing the pie all over the battlefield! Angles and lines of sight are key elements to the game of 40k, and if you're careful about your exposure, you'll be able to take advantage of several aspects of the cover save rule.
Now... go eat some pie.
Saturday, February 26, 2011
DIY: 40k Conversions - Magnetized Land Raider
There are a lot of reasons to utilize magnets when building your vehicles for 40k. The chief reason, of course, is the fact that GW has made these things so expensive, that it's hard to justify purchasing just a few rather than one for each possible varient. Apparently the marketing geniuses at GW haven't figued out that if they charged just a little over half of what they do now, everybody would buy twice as many. So, to avoid extortion... er... the ridiculous expense of buying multiple vehicles, rare earth magnets are a modern modeler's god send.
Because of the expense associated with each kit, the landraider is a common subject for magnets. There are lots of ways to magnetize the parts to a landraider to make the different varients. Because all of the parts are now plastic, there are some folks that have come up with some rather ingenious methods for magnetizing each individual gun so that you can just swap them out on the fly. A great example of this method can be found at The Rollin Waagh: http://therollinwaaagh.blogspot.com/2008/12/magnetized-land-raider.html. I really like this method and may try it out someday.
When I put mine together, however, the Crusader was still a metal/plastic hybrid kit, and you simply couldn't use magnets in the way shown above. The bolter assembly was just too heavy for that kind of thing. So, I came up with my own method -- a method that can also be used for other sponsons, including those on the sides of Baneblades and Predator tanks...
Supplies
The first step for any project is acquiring the tools and supplies you need. Fortunately, for this project, you don't need much:
- 1 complete Land Raider kit
- 1 Land Raider Crusader/Redeemer sprue set - 2 rare earth magnets
- 2 flat faced screws
- 4 very short screws - computer case screws are great; flat faced if you can find them
- 1 sheet of 1.5mm-2mm plasticard (a/k/a sheet styrene) - nothing thicker is necessary, and anything thinner would be too flimsy
Assembly
(1) Cut out a piece of plasticard that fits over the interior space of the sponson hatch. I used 2mm sheet because it fit flush with the guide rails. Neatness is optional.
 (2) Screw a flat topped screw directly into the center of the plasticard. I tapped the hole with a pin drill first.
 (3) Next, I put a simple short screw from a computer case directly into the center of the sponson back itself. It's easiest to do this before you've actually put the whole sponson together so that you can ensure that you're drilling in the center of the hatch from the other side. I left the screw post sticking out on the other side, which means you can see it, but I don't think it matters either way...
 (4) Next up, you need to actually acquire some rare earth magnets. I purchased mine a long time ago in a packet of about two hundred and fifty that I've never used up. These things are incredibly strong! Mine are neodymium (Nd2Fe14B), which means they were relatively cheap. But even a tiny one that is only about 1.5mm to 2mm thick is more than enough to hold the sponsons on.
 (5) Then assemble the tank. Follow the instructions. I have opted to glue all of my hatches shut because I game with my models and don't care for the tiny interior details. Plus, I don't have to try and lop off the ends of my screws that are sticking into the main body of the tank!
 (6) Still assembling. As you can tell, once the exterior of the tread walls are up, it looks pretty snazzy from the outside.
 (7) As you can tell, you then just pop the magnet right on top of the interior screw. No glue, no mess, no fuss. The magnet is plenty strong enough to hold both sides together. You can now adjust the interior screw up or down as needed so that the fit is snug between the screws and the magnet. Once you find the right spot, super glue the screw in place.
 (8) And here the sponson is all popped in and ready to go. Now you just need to make sure you do the same thing with the other side and include a computer case screw in every other sponson hatch you create for it. Just note that you need to put the same size screw in every sponson hatch so that the snug is always fit between the screws and the magnet.
I'm toying with the idea of also putting together a Prometheus set of sponsons as well. If hurricane bolters are nasty against troops at 24", how deadly are four twin-linked heavy bolters at 36"? Talk about a rolling anti-horde Devastator Squad...
Anyway, the next step is making a swap out set of hatches for the multi-melta and a swap out set of turrets for the heavy bolters and assault cannons, but that's all pretty straight forward.
Because of the expense associated with each kit, the landraider is a common subject for magnets. There are lots of ways to magnetize the parts to a landraider to make the different varients. Because all of the parts are now plastic, there are some folks that have come up with some rather ingenious methods for magnetizing each individual gun so that you can just swap them out on the fly. A great example of this method can be found at The Rollin Waagh: http://therollinwaaagh.blogspot.com/2008/12/magnetized-land-raider.html. I really like this method and may try it out someday.
When I put mine together, however, the Crusader was still a metal/plastic hybrid kit, and you simply couldn't use magnets in the way shown above. The bolter assembly was just too heavy for that kind of thing. So, I came up with my own method -- a method that can also be used for other sponsons, including those on the sides of Baneblades and Predator tanks...
Supplies
The first step for any project is acquiring the tools and supplies you need. Fortunately, for this project, you don't need much:
- 1 complete Land Raider kit
- 1 Land Raider Crusader/Redeemer sprue set - 2 rare earth magnets
- 2 flat faced screws
- 4 very short screws - computer case screws are great; flat faced if you can find them
- 1 sheet of 1.5mm-2mm plasticard (a/k/a sheet styrene) - nothing thicker is necessary, and anything thinner would be too flimsy
Assembly
(1) Cut out a piece of plasticard that fits over the interior space of the sponson hatch. I used 2mm sheet because it fit flush with the guide rails. Neatness is optional.

I'm toying with the idea of also putting together a Prometheus set of sponsons as well. If hurricane bolters are nasty against troops at 24", how deadly are four twin-linked heavy bolters at 36"? Talk about a rolling anti-horde Devastator Squad...
Anyway, the next step is making a swap out set of hatches for the multi-melta and a swap out set of turrets for the heavy bolters and assault cannons, but that's all pretty straight forward.
Subscribe to:
Posts (Atom)