The basic concept of the Refused Flank is to convince your opponent to spread out over a wide front (the traditional gun line formation) while deploying your own forces concentrated to a side of the table - one flank of his forces. You are thus "refusing" the other side of your opponent's force. The point of this approach is that you will be able to bring overwhelming force to one side of your opponent's army while he is forced to redeploy his forces from the refused flank to support the outnumbered side of his army.
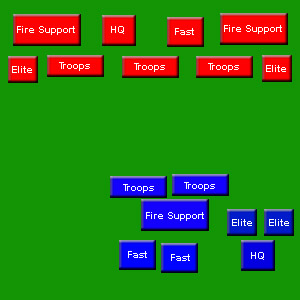
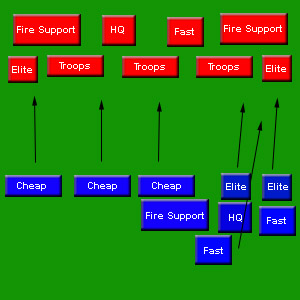
In a perfect setting, a refused flank set up should look something like the force distribution below:

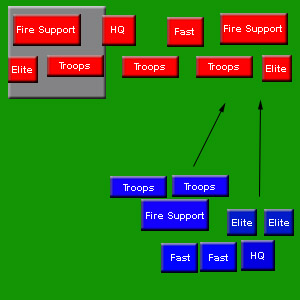
The enemy's forces are spread out in a traditional pitched battle deployment, and your own forces are overloaded on the other side. In the next picture below, you can see just how your forces will then execute this textbook attack:
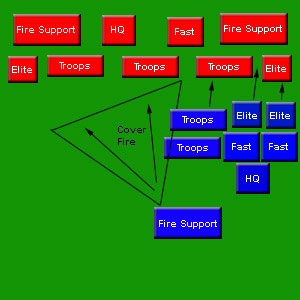
As your mid-ranged units move up the side, they can take pot shots at the flank that is being attacked and then later be used to slow down your enemy's forces as he tries to reinforce his flank. Your slow units, which will be near the spearhead of the attack, should be able to lock horns with your enemy's flank while he is still playing catch up. when coupled with your medium and fast units, a well timed hit can overwhelm the offered flank and allow you to clean up the other guy's units as they either sprint in to the slaughter, or hunker down as he watches half of his army disintegrate.
The Set-up
Ok, so you've got an idea, but how do you pull it off? In a traditional 5th edition set-up, one side deploys all of his forces first, and then the second guy deploys his own. In a perfect world, your opponent wins the first turn, sets up his forces in a traditional gunline, and then you sieze the initiative after setting up your own forces in the refused flank formation. The perfect set up almost never happens because: (a) you win the first turn and will have to show your hand before he sets his own forces up, or (b) you don't seize the initiative and the enemy gets the chance to use his first turn to start countering your flank attack before you get a chance to make your move.
But all is not lost. There are certainly ways you can disguise what you're doing, or can draw your opponent into staying put and can then whittle away his forces at leisure.
- Delay the Obvious: If it's obvious that you're trying to flank your opponent (i.e. you've already set up, and you didn't have enough forces to make it look like you were doing anything other than a refused flank attack), then delay the push. Place a small part of your force towards the middle of the table, preferably a part that can still pick off units on the targeted flank and still slow down units that move to support his weak spot. Next, only advance your slower flank units at first. When they are close to closing with the targeted flank, race your fast units behind them so that they hit about the same time. If you leave enough at home, it may not be as obvious that you're trying to overwhelm one side of the board, and he may leave the bulk of his forces 'at home' until it is too late to lend support to the attacked flank.

- Sacrifice: Similar to delaying the obvious, try to counter his heavy hitting units on the untargeted flank with cheaper units that will keep his heavy hitters at home. For instance, if he's got a slow deathstar unit on the opposite flank, then put a small combat squad or equivalent throw away unit to confront him on that side of the board. Likewise, if he has set up with heavy weapon squads on one side of the board (like a pair of devastator squads), then put your own cheaper heavy unit on that side of the board (like a whirlwind). The idea is that you want him to commit much more expensive units to the refused side of the board while you have significantly less of your army to confront him. It will appear as though you want to trade blows, but in actuality you're trying to sucker him into leaving a flank exposed to the bulk of your army. Note that units with a scout move or infiltration can be ideal for this because they will look like a real threat and will commit your opponent's heavy hitters for longer. While he thinks you've handed him a simple juicy unit to squish, you're really suckering him out of position to where that tough unit could be doing much more harm to your forces.


- Quick Switch: Basically, you want to set up like you would a Sacrifice, except you won't be leaving cheap units to confront him. Instead, you put your faster units on the refused side of the board. Then, when the game begins, you pull out and move them laterally to join the thrust of your forces. The faster your forces (landspeeders, bikes, ravagers, grav tanks, etc.), the better because they can turbo boost and quickly out pace the refused forces you're leaving behind. While that does mean you'll loose a turn or two of using these forces, but he'll be leaving much more expensive units behind and out of position for much longer.

- Handing Over the Keys to the Castle: When your opponent is given the opportunity to have a piece of terrain that is perfect for an expensive unit of his own (e.g. a good berm for his mega tank, a bunker for his heavy weapons squads, a concealed approach to your own lines for his deathstar unit, etc.), let him have it and then refuse that flank. If he thinks he's got a solid defensible position, then he's not going to want to leave it, even after you start decimating the forces on the other side of the board.
- Fun House Mirror: If you've got access to a LOT of cheap units, then you might want to mirror your opponent's across the board set-up with much cheaper units of your own. While he is evenly spread out, you'll look like you're evenly spread out, but in actuality you've got the majority of your points on a single flank. In a lot of ways, this is just a broader use of sacrifice units. But, when you've got lots of cheap sacrifice units that you can race forward, and still maintain a heavy thrust to a single flank, it may not be as obvious that you're trying to keep his forces at home.
Problems
Like I said, nothing is fool proof. Sometimes your opponent figures out what you're doing and will move his own forces to counter your effort. In fact, some armies, such as the Eldar (with Eldrad), have a built-in ability to redeploy their forces and you can easily find your big bad plan fall apart. If your opponent can redeploy quickly and he has an assault heavy army, he may decide to overload your side of the table - forcing a bloody confrontation. If he's fast and light, he may redeploy in the opposite quarter, making for a long drawn out battle on the longest possible battlefield. Frankly, there are just some armies that are not easy to cage in with the refused flank tactic. A lot of that is going to depend on what shows up on the field the day of the battle. If you see a fair amount of slow/heavy units spread across the board, then he's prime for the refused flank. But if he's quick and nimble, it may not be the best approach.
Good luck!